Goal: Complete the game as fast as possible with any previously collected equipment & personnel at your disposal - without getting spotted
Kills are allowed, but generally slower with lethal strategies being rare exceptions on all routes below.
Useful Knowledge
Noteworthy Techniques and Notations
Soldier & Equipment Setup
Unlike New Game runs, NG+ runs allow you to optimize your setup over as many playthroughs as necessary before starting your timed run. Things including, but not limited to having the best Soldier Types, Careers, Stats & Skills, their individual Equipment or even their positioning within the Teams to minimize time spent menuing during the run.
This guide and its routes often require the runner to have the best possible combination for any scenario at hand. Legitimately setting up a fully optimized save will take 100+ hours and take you through hundreds of recruitments due to the extremely rare nature of getting ideal Career combinations such as Athlete (increased run speed) + Gambler (~10% chance to double your damage per shot), along with a decent amount of Life and the right Stats.
The New Game + Master Save [PAL] prepared by MarlonH8 has all this taken care of already. It's optimized to the theoretical maximum for all difficulties.
This “ideal” setup can be cross-referenced below:
| Sneaking Unit | Important Careers | Important Stats/Skills | Equipment | Used on |
| <html><span style=“color:khaki;”><b><i>Team Alpha</i></b></span></html> resets upon starting NG+ | | | | |
| <html><span style=“color:darkseagreen;”><b>Team Bravo</b></span></html> | | | | |
Officer (F) B-1 [EASY/NORMAL] | Athlete + Gambler | Life, Sniper Rifle, Traps | [Mosin N] [TNT] [Med Kit L] [C Box] | WS/Python |
| USSR B-2 | Athlete | / | [/] [/] [/] [C Box] | RL1 |
| Filler B-3 | / | / | [/] [/] [/] [/] | / |
| USSR B-4 | Athlete | Traps | [/] [TNT] [/] [C Box] | SD2, RB1, SD3, RL2, RB2, HB |
| <html><span style=“color:crimson;”><b>Team Charlie</b></span></html> | | | | |
| Any C-1 | Athlete + Gambler | Life, >= A Handgun, Sniper Rifle | [SAA] [SVD] [Med Kit L] [Body Armor]2) | Gene |
| Filler C-2 | / | / | [/] [/] [/] [/] | / |
| USSR C-3 | Athlete | Heavy Weapons | [RPG-7] [Ammo HEAT] [Med Kit L] [C Box] | PT/RAXA |
| (OPEN) | - | - | - | - |
| <html><span style=“color:lightblue;”><b>Team Delta</b></span></html> | | | | |
| FOX D-1 | Athlete + Gambler | Sniper Rifle/Heavy Weapons | [M63] [SVD] [Med Kit L] [C Box] | A, SE1/Null1, SE2, PS1, PS2/Null2, SE3 |
| FOX D-2 | Athlete | >= B CQC | [/]3) [Chaff G] [/] [C Box] | SC |
Officer (F) D-4 [EXTREME] | Athlete + Gambler | Life, Sniper Rifle, Traps | [Mosin N] [TNT] [Med Kit L] [C Box]4) | WS/Python |
| USSR A-1 | Athlete + Rescuer | >= A CQC, Throwing Weapons, Traps | [Mk22] [TNT] [Stun G] [C Box] | SD1, HPT, SPB2, SB, RB3, GH, R, Cunningham |
| Other Key Members | Important Careers | Important Stats/Skills |
| Independent: Slot 1 | | |
| Tech-1 (Any) | Not Elite Engineer/Engineer | >= A Technical |
| All: Slots 1, 2, 3 | | |
| Spy-1 (Ursula/Any) | / | 100/90 Sense |
| Spy-2 (Venus/Any) | / | >= 65 Sense |
| Spy-3 (Null/Any) | / | >= 60 Sense |
While the main route presented in this guide is based on EXTREME Difficulty, the majority of these strategies and routes work identically on their EASY & NORMAL counterparts.
If there are alternatives available to any Difficulty, they will be marked by their respective tags (e.g., [EASY-only], [EASY/NORMAL-only], [EXTREME] etc.).
All of the occurences relating to the main route are also listed below:
| Stage | Difficulty | Routing Change |
| Pre-SPB1 Briefing | EASY/NORMAL | No need to swap a member onto D-4 |
| Supply Depot I. | EASY | Usually free instant knockout due to lower guard stats → Use the “Slam Route” |
| Research Lab I. | EASY/NORMAL | No patrol at the top of the ramp → “Direct Route” and “Team Alpha's Swapless Route” are now feasible |
| Security Base | EASY | Usually free instant knockout due to lower guard stats → The “No Hold Up Route” is now possible |
| Warhead Storage | EASY/NORMAL | No cam, no need to swap → Go with “Team Bravo's Swapless Vent OOB Route” |
| Airport | EASY | No terminal guard at the top → Make use of the “Direct Route” instead |
| Power Substation II. | EASY/NORMAL | Officer positioning changed → “Direct Route” and “Drop Route” are the appropriate substitute routes |
| Silo Complex | EASY | No additional guard in front of locked door #2 → The “Direct” and “Safe” alternative routes are now viable |
| Silo Complex (NTSC) | EASY/NORMAL | Different Key location → Use the “NTSC Key Route” |
All bosses deal less damage, but otherwise behave in the exact same manner on EASY & NORMAL, as opposed to EXTREME. The other important difference lies in the amount of health & stamina that you can drain per hit.
This is generally5) increased by at least 100% on NORMAL and 200% on EASY. All in all, these changes alone already enable EASY speedruns to finish over 100 seconds earlier than a run on EXTREME Difficulty would.
Standard Route
Double Handle Grab
You can skip one of the cell door handle grab animations here. In order to do that, you need to run towards the door's handle in a way that places yourself just out of range to normally initiate the door opening animation when pressing the action button.
If properly executed, this precise trick makes one handle grab count as two or more and therefore advances Snake straight to the text box.
The skip was discovered by Pythonicus during his first full speedrun!
Standard Route
| Action | Input |
| Fast forward Dialogue | |
| Swap Snake with “USSR A-1” | Square ↑ Square |
[EXTREME] Swap Snake with “Officer (F) D-4” | Square ↑ Square |
| Select Soviet Patrol Base | |
| Fast forward Dialogue | |
| Start Mission | |
Standard Route
| Action | Input |
| Fast forward Dialogue | |
| Select Supply Depot | ↑ |
| Fast forward Dialogue | |
| <html>Select <span style=“color:khaki;”>Team Alpha</span> & start Mission</html> | |
Cutscene/Text Triggers
Cutscene or Text Triggers like the one here temporarily block you from moving. If you enter the trigger area with a roll, your animation will carry you a bit further.
| Safe Route (2+s timeloss) | Crate Roll Route (<1s timesave) | Ultimate Precision Route (2+s timesave) | | | |
| The ol' reliable - beginner's route! | Semi-precise optimization | Near TAS-like precision needed! - not recommended! | | | |
| | | | | | |
Standard Route
| Action | Input |
| Fast forward Dialogue | |
| Select Comm Base | ↑ |
| Fast forward Dialogue | |
| Select Comm Base | |
| Fast forward Dialogue | |
| <html>Select <span style=“color:darkseagreen;”>Team Bravo</span> & start Mission</html> | |
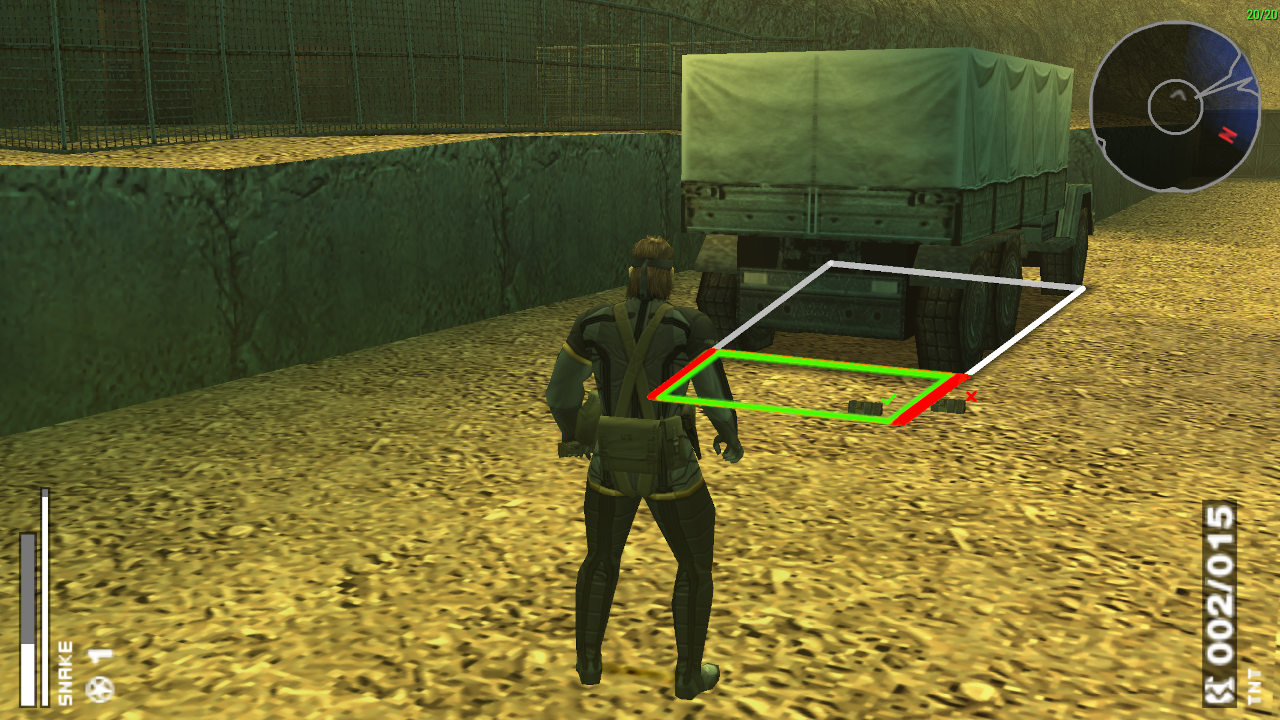
Truck Recruitment Positioning
Make sure to not drag soldiers too close to the truck's rear. Snake will always go towards a fixed spot, which is a certain distance behind the truck.
If you entered the trigger zone from an unfavorable position, you could lose valuable seconds due to longer animations.
Why Supply Depot?
While the game recommends you to go to the Soviet Patrol Base, you can actually visit any of the available stages to complete this recruitment mission.
We're simply recruiting this soldier on this stage, because he is closer to our truck and therefore faster to drag there than anyone else. The TNT pickup is an added bonus.
[EASY-only] Slam Route (1+s timesave) | | |
| Possible timesave on EASY due to usually much lower soldier stats | | |
| | | |
Standard Route
| Action | Input |
| Fast forward Dialogue | |
| Select Hospital | |
| Fast forward Dialogue | |
| <html>Select <span style=“color:khaki;”>Team Alpha</span> & start Mission</html> | |
Standard Route
| Action | Input |
| Fast forward Dialogue | |
| Select Research Lab | |
| Fast forward Dialogue | |
| <html>Select <span style=“color:darkseagreen;”>Team Bravo</span> & start Mission</html> | |
| Team Charlie's Swap Route (<1s timesave IGT/1+ timeloss RTA) | | |
| The angle for the roll into prone is quite unfavorable - not recommended! | | |
| | | |
Standard Route
| Action | Input |
| Fast forward Dialogue | |
| Spy-1 (Ursula/Any) → Spy Unit - Supply Depot | ← Square → → R R Square |
| Spy-2 (Venus/Any) → Spy Unit - Soviet Patrol Base | R Square ← ← ↓ Square |
| Spy-3 (Null/Any) → Spy Unit - Research Lab | ↓ Square → → ↑ Square |
| Wait once for Supply Depot Report | |
| Read it & fast forward Dialogue | |
| Select Supply Depot | ↓ ↓ ↓ |
| Fast forward Dialogue | |
| <html>Select <span style=“color:darkseagreen;”>Team Bravo</span> & start Mission</html> | |
[EASY/NORMAL-only] Direct Route (<1s timesave IGT/<1s timesave RTA) | [EXTREME] Team Alpha's Swapless Route (2+s timeloss IGT/<1s timesave RTA) | [EASY/NORMAL-only] Team Alpha's Swapless Route (<1s timeloss IGT/2+s timeloss RTA) | Team Alpha's Vent OOB Route (2+s timesave IGT/<1s timeloss RTA) | | | |
| One guard less on EASY/NORMAL | Same route minus the Member Change | One guard less on EASY/NORMAL and no Member Change | Using a Glitched Box Equip to start the level from the opposite end without a Member Change | | | |
| | | | | | | |
Standard Route
| Action | Input |
| Fast forward Dialogue | |
| Select Rail Bridge | |
| Fast forward Dialogue | |
| <html>Select <span style=“color:darkseagreen;”>Team Bravo</span> & start Mission</html> | |
Standard Route
| Action | Input |
| Fast forward Dialogue | |
| Wait for Supply Depot Report (or Research Lab Report or Soviet Patrol Base Report) | |
| Read it & fast forward Dialogue | |
| OPTIONAL: Use up all your Waits (will improve Spy Report acquisition rate) | |
| <html>Select <span style=“color:darkseagreen;”>Supply Depot</span> (<b>or</b> <span style=“color:darkseagreen;”>Research Lab</span> <b>or</b> <span style=“color:khaki;”>Soviet Patrol Base</span></html>) | ↓ ↓ ↓ (or ↑ ↑ or ↑ ↑ ↑ ↑) |
| Fast forward Dialogue | |
| <html>Select <span style=“color:darkseagreen;”>Team Bravo</span> (<b>or</b> <span style=“color:khaki;”>Team Alpha</span>) & start Mission</html> | |
| Team Alpha's Swapless Route (1+s timeloss IGT/2+s timesave RTA) | | | |
| Same route minus the Member Change | | | |
| | | | |
For the TNT-blowup missions (9-A, 9-B, 9-C [& 9-D]) the order in which you read and complete the Spy Reports can help you save around a second by skipping some pre-deployment dialogue.
If you receive more than one TNT Report during a Briefing session, make sure to read the canonically later one first. Then, read the other one(s) and complete the last Report, which you've read.
The canon timeline looks like this: [Town >] SPB > RL > SD
Examples: If you get both RL & SD Reports, read RL first, then read and complete SD. If you receive Reports for SPB & RL, read SPB before reading and completing RL.
After finishing three of these missions, you can move on to [10] Rail Bridge II.!
Standard Route
| Action | Input |
| Fast forward Dialogue | |
If this was your 3rd Diversionary Op: Select Rail Bridge, fast forward Dialogue, select Team Bravo & start Mission | |
| Wait for Research Lab Report (or Soviet Patrol Base Report) | |
| Read it & fast forward Dialogue | |
| <html>Select <span style=“color:darkseagreen;”>Research Lab</span> (<b>or</b> <span style=“color:khaki;”>Soviet Patrol Base</span></html>) | ? |
| <html>Select <span style=“color:darkseagreen;”>Team Bravo</span> (<b>or</b> <span style=“color:khaki;”>Team Alpha</span>) & start Mission</html> | |
Standard Route
| Action | Input |
| Fast forward Dialogue | |
If this was your 3rd Diversionary Op: Select Rail Bridge, fast forward Dialogue, select Team Bravo & start Mission | |
| Wait for Soviet Patrol Base Report (or Supply Depot Report) | |
| Read it & fast forward Dialogue | |
| <html>Select <span style=“color:khaki;”>Soviet Patrol Base</span> (<b>or</b> <span style=“color:darkseagreen;”>Supply Depot</span></html>) | ? |
| <html>Select <span style=“color:khaki;”>Team Alpha</span> (<b>or</b> <span style=“color:darkseagreen;”>Team Bravo</span>) & start Mission</html> | |
| Swapless Route (1+s timeloss IGT/1+s timesave RTA) | | | |
| Same route minus the Member Change | | | |
| | | | |
Standard Route
| Action | Input |
| Fast forward Dialogue | |
If this was your 3rd Diversionary Op: Select Rail Bridge, fast forward Dialogue, select Team Bravo & start Mission | |
| Wait for Supply Depot Report (or Research Lab Report) | |
| Read it & fast forward Dialogue | |
| <html>Select <span style=“color:darkseagreen;”>Supply Depot</span> (<b>or</b> <span style=“color:darkseagreen;”>Research Lab</span>)</html> | ? |
| <html>Select <span style=“color:darkseagreen;”>Team Bravo</span> & start Mission</html> | |
TNT Diversionary Operation... D?!
There is one more location in which you could perform a diversionary operation; Town! However, since it has by far the slowest route it is in no way viable for the run.
| Non-Lethal Route (3+s timeloss) | | | |
| Pacifist! | | | |
| | | | |
| Action | Input |
| Fast forward Dialogue | |
| Select Rail Bridge | |
| Fast forward Dialogue | |
| <html>Select <span style=“color:darkseagreen;”>Team Bravo</span> & start Mission</html> | |
Standard Route
| Action | Input |
| Fast forward Dialogue | |
| Select Harbor | |
| Fast forward Dialogue | |
| <html>Select <span style=“color:darkseagreen;”>Team Bravo</span> & start Mission</html> | |
| Team Alpha's Swapless Route (1+s timeloss IGT/2+s timesave RTA) | | | |
| Same route minus the Member Change | | | |
| | | | |
Standard Route
| Action | Input |
| Fast forward Dialogue | |
| Spy-1 (Ursula/Any) + Spy-2 (Venus/Any) → Spy Unit - Security Base | ← Square → → ↑ Square Square ← ← ↓ Square |
| Wait for Security Base Report | |
| Read it & fast forward Dialogue | |
| Select Security Base | ↓ |
| Fast forward Dialogue | |
| <html>Select <span style=“color:khaki;”>Team Alpha</span> & start Mission</html> | |
NTSC vs PAL
Unlike on PAL, the cutscene trigger won’t save you from taking fall damage in the NTSC releases.
Standard Route
| Action | Input |
| Fast forward Dialogue | |
| Select Warhead Storage | |
| Fast forward Dialogue | |
[EXTREME] <html>Select <span style=“color:lightblue;”>Team Delta</span> & start Mission</html> | |
[EASY/NORMAL-only] <html>Select <span style=“color:darkseagreen;”>Team Bravo</span> & start Mission</html> | |
[EASY-only] No Hold Up Route (<1s timesave) | | | | |
| Possible timesave on EASY due to usually much lower soldier stats | | | | |
| | | | | |
Standard Route
[EXTREME] Route | [EASY/NORMAL-only] Route |
| Perform a Member Change to D-4 (↓ ↓) | |
| Rush into the corridor northeast of you | Head into the corridor northeast of you |
| Avoid the camera by sticking close to the left wall while descending into the big hall | Stick left while running down the ramps and continue into the big hall |
[EASY/NORMAL-only] Team Bravo's Swapless Vent OOB Route (<1s timesave IGT/2+s timesave RTA) | [EXTREME] Glitchless Lure Route (35+s timeloss) | [EASY/NORMAL-only] Team Bravo's Glitchless & Swapless Box Lure Route (32+s timeloss IGT/29+s timeloss RTA) | [EXTREME] Team Delta's Glitchless & Risky Box Lure Route (29+s timeloss) | | | |
| Same route minus the Member Change | C Box can be swapped for Body Armor beforehand | C Box to lure the guard, no cam | Not recommended! | | | |
| | | | | | | |
Standard Route
| Action | Input |
| Fast forward Dialogue | |
| Wait for Security Base Report | |
| Read it & fast forward Dialogue | |
| Select Airport | ↓ |
| <html>Select <span style=“color:lightblue;”>Team Delta</span> & start Mission</html> | |
FPV Lookdown Exploit
Looking down while in FPV mode prevents most enemies' incoming fire from hitting you, This works, because looking down in FPV seems to turn your plane of a hurtbox parallel to the ground.
Since this strategy was discovered in 2017 by MarlonH8 it fundamentally made the game much easier than it was before - from both a speedrun and casual perspective.
Python's RNG
Python will react differently to incoming damage. Ideally, you'd want to see his long recovery animation that barely leaves any room for him to retaliate, but this is rarely the case.
[EASY-only] (10+s timesave) | [NORMAL-only] (6+s timesave) | | | | | |
| / | / | | | | | |
| | | | | | | |
Standard Route
| Action | Input |
| Fast forward Dialogue | |
| Select Silo Entrance | |
| Fast forward Dialogue | |
| <html>Select <span style=“color:lightblue;”>Team Delta</span> & start Mission</html> | |
[EASY-only] Direct Route (<1s timesave) | | | | | |
| The missing terminal guard makes a more direct approach viable | | | | | |
| | | | | | |
Standard Route
Standard Route
| Action | Input |
| Fast forward Dialogue | |
| Select Silo Entrance | |
| Fast forward Dialogue | |
| <html>Select <span style=“color:lightblue;”>Team Delta</span> & start Mission</html> | |
Top Snipe One Shot
[EASY-only] (19+s timesave) | [NORMAL-only] (15+s timesave) | M63 Strat (26+s timeloss*) | [EASY] Crouch Strat (20+s timesave) | | | |
| / | / | Easier, but much slower alternative - not recommended! - *less timeloss on EASY/NORMAL | Beware of smaller hitboxes - not recommended! | | | |
| | | | | | | |
Standard Route
| Action | Input |
| Fast forward Dialogue | |
| Select Rail Bridge | ↑ ↑ ↑ ↑ ↑ ↑ |
| Fast forward Dialogue | |
| <html>Select <span style=“color:khaki;”>Team Alpha</span> & start Mission</html> | |
| Fullspeed Route (<1s timesave) | Risky “Oof” Strats (2+s timesave) | | | |
| Skips equipping the C Box | RKD on guard while dropping below - “Oof” when failed | | | |
| | | | | |
Standard Route
| Action | Input |
| Fast forward Dialogue | |
| Select Guest House | |
| Fast forward Dialogue | |
| <html>Select <span style=“color:khaki;”>Team Alpha</span> & start Mission</html> | |
History of the "Spy Report Skip"
Here, we are performing a sequence break - accidentally discovered by miniomegaking. While watching one of mini's Rail Bridge route videos, MarlonH8 noticed that the guard patterns were different. Originally assumed to be either regional differences, the oddity was shortly thereafter explained by the fact that mini forgot to place spies in the area to notify him of the report and therefore skipped one step ahead.
Immediately afterwards, we tried to find similar spy report skips, but didn't have much luck. MarlonH8 did find another one for the Town Diversionary Op., which unfortunately is the slowest of the “TNT-missions” and therefore not part of the run.
Standard Route
| Action | Input |
| Fast forward Dialogue | |
| Spy-1 (Ursula/Any) + Spy-2 (Venus/Any) → Spy Unit - Silo Entrance | ← Square → → ↑ Square Square ← ← ↓ Square |
| Select Plant | |
| Fast forward Dialogue | |
| <html>Select <span style=“color:crimson;”>Team Charlie</span> & start Mission</html> | |
| Vent OOB Glitch (4+s timesave) | | | | |
| Using a Glitched Box Equip to go OOB and straight to the AP - Easy to get spotted | | | | |
| | | | | |
Standard Route
Standard Route
| Action | Input |
| Confirm & fast forward Dialogue | |
| Wait for Silo Entrance Report | |
| Read it & fast forward Dialogue | |
| Spy-1 (Ursula/Any) + Spy-2 (Venus/Any) → Spy Unit - Ravine | → ↑ L Square ↓ Square Square ↑ Square |
| Tech-1 (Any) → Technical Unit | @Spy Unit → Square → → Square |
| Wait for Ravine Report | |
| Read it & fast forward Dialogue | |
| Select Ravine | ↓ |
| Fast forward Dialogue | |
| <html>Select <span style=“color:khaki;”>Team Alpha</span> & start Mission</html> | |
There is an RPG-7 with 10 loaded rockets found towards the northeast and an additional box of Ammo (HEAT) x20 found in the southern end of the hall.
[EASY-only] (30+s timesave) | [NORMAL-only] (29+s timesave) | | | | | |
| / | / | | | | | |
| | | | | | | |
[III] Lights Out and Away We Go
Standard Route
| Action | Input |
| Fast forward Dialogue | |
| Select Power Substation | |
| Fast forward Dialogue | |
| <html>Select <span style=“color:lightblue;”>Team Delta</span> & start Mission</html> | |
Standard Route
| Action | Input |
| Fast forward Dialogue | |
| Wait for Detonation Timer development to “begin” | |
| Confirm it & fast forward Dialogue | |
| Equipment (FOX D-1): Equip Time Bomb onto M63 | [Time Bomb] [SVD] [Med Kit L] [C Box] - (R R R O O O R ↑ O) |
| Select Power Substation | |
| Fast forward Dialogue | |
| <html>Select <span style=“color:lightblue;”>Team Delta</span> & start Mission</html> | |
| Simple Route (1+s timeloss) | Fullspeed Route (<1s timesave) | |
| From A to B within a safe cycle | Must be near-perfect to avoid detection - easier at night! | |
| | | |
Standard Route
[EASY/NORMAL-only] Direct Route (<1s timeloss) | Drop Route (<1s timeloss) | [EASY/NORMAL-only] Drop Route (1+s timeloss) | |
| Different guard position on EASY/NORMAL | An alternative path | Different guard position on EASY/NORMAL - an alternative path | |
| | | | |
Standard Route
| Action | Input |
| Fast forward Dialogue | |
| Select Silo Entrance | |
| Fast forward Dialogue | |
| <html>Select <span style=“color:lightblue;”>Team Delta</span> & start Mission</html> | |
[EASY-only] (26+s timesave) | [NORMAL-only] (22+s timesave) | M63 Strat (22+s timeloss*) | [EASY] Crouch Strat (27+s timesave) | | | |
| / | / | Time Bomb → SVD instead - slow, not recommended! - *less timeloss on EASY/NORMAL | Beware of smaller hitboxes | | | |
| | | | | | | |
Standard Route
| Action | Input |
| Fast forward Dialogue | |
| Select Silo Complex | |
| Fast forward Dialogue | |
| <html>Select <span style=“color:lightblue;”>Team Delta</span> & start Mission</html> | |
| Fullspeed Route (1+s timesave) | | |
| Very tight and very risky - not recommended! | | |
| | | |
Standard Route
| PAL/Guard Route | NTSC/Key Route |
| Head forward and right, then grab the nearby FOX soldier from behind | Head forward past the pillar and crates, then continue right and take a left |
| Drag him to the door you just passed and push-drop him once it's open | Pass through the door and roll across four gaps on your way to the eastern wall |
| | Cross the southern gaps with two more rolls, then climb up and pick up Key E |
| | Roll to the ground and head back the way you came from by ascending the ladder |
| | Exit the hall and head north, to the door behind the right set of crates |
| PAL/Guard Route | NTSC/Key Route |
| Stick to the right wall before approaching the shielded guard | Unequip your Box and equip your Chaff G before heading southeast |
| BB past him and escape through the door, onto the bridge | Pass the shielded guard by squeezing by just behind him |
| Continue box-walking through the next door and take a left | Go through the door, cross the bridge and head into the next building |
| Head down the corridor until the only way further leads south | Throw a Chaff G, then equip your Box and head left to follow the path |
| Box-walk southwest, below the gun cameras and past the guard | Walk past the gun cameras and BB into the guard behind the right wall |
| Escape through the formerly locked door next to him | Immediately reequip your Box and flee through the door next to him |
| Action | Input |
| Fast forward Dialogue | |
| Select Silo Complex | |
| Fast forward Dialogue | |
| <html>Select <span style=“color:khaki;”>Team Alpha</span> & start Mission</html> | |
PAL vs. NTSC
Arguably the biggest version difference of the run is right here. On NTSC versions you can not drag any soldier in front of the 1F door to open it.
Opening your contact list and calling Paramedic and Sigint saves time compared to manually tuning to 145.75 and 148.51, even if you get caught up in one or two conversations.
Door Frequencies
145.75 is dialed to get you through the locked 1F door in the room behind the “wall guard”. 147.42 is called to unlock the 2F door leading onto the bridge and 148.51 is used so you can quickly rush through the door past the final FOX soldier.
[EASY-only] Direct Route (<1s timesave IGT/<1s timesave RTA) | [NORMAL/EXTREME] Safe Route (6+s timeloss IGT/5+s timeloss RTA) | [EASY-only] Safe Route (6+s timeloss IGT/5+s timeloss RTA) | [EXTREME-only] NTSC Key Route (24+s timeloss IGT/24+s timeloss RTA) | [EASY/NORMAL-only] NTSC Key Route (11+s timeloss IGT/9+s timeloss RTA) | | |
| No shielded guard | No need to stay within the god-cycle | No shielded guard and no need to stay within the god-cycle | NTSC's fastest option | NTSC's fastest option - different Key position - bring a Magazine! | | |
| | | | | | | |
Standard Route
| Action | Input |
| Fast forward Dialogue | |
| Select Launch Control Room | |
| Fast forward Dialogue | |
| <html>Select <span style=“color:crimson;”>Team Charlie</span> & start Mission</html> | |
[EASY-only] (5+s timesave) | [NORMAL-only] (2+s timesave) | | |
| / | / | | |
| | | | |
Standard Route
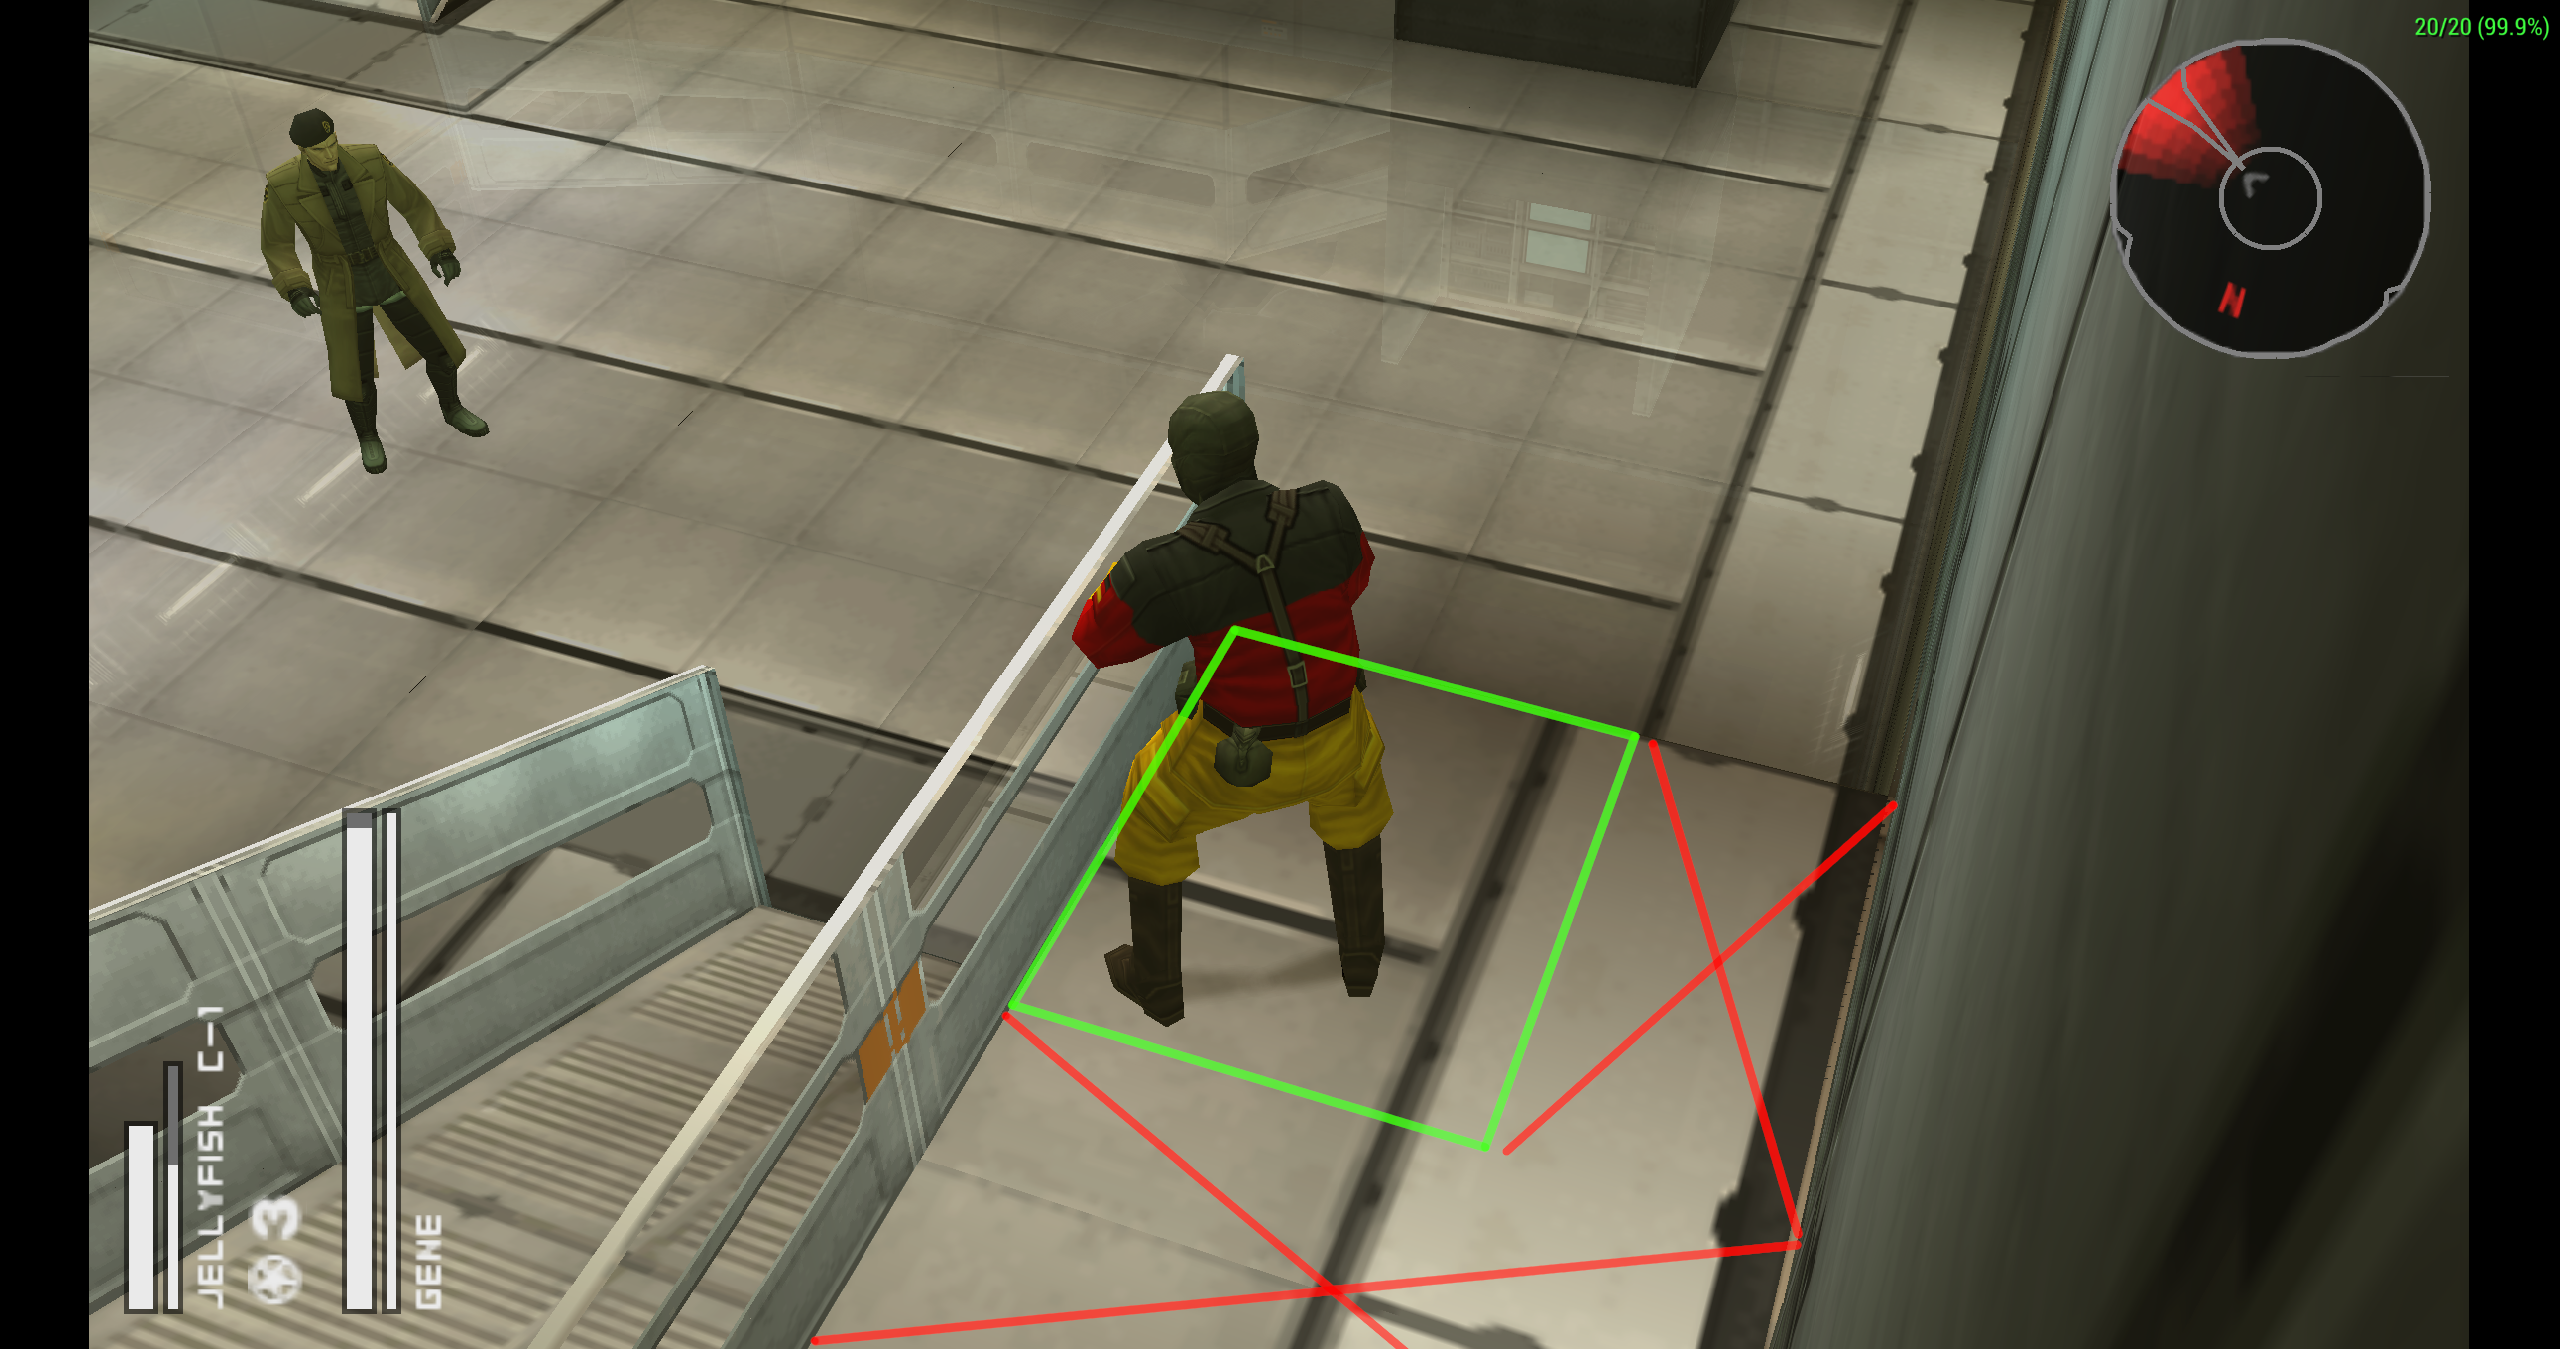
Emulator Crash Trivia
[EASY-only] (10+s timesave) | [NORMAL-only] (9+s timesave) | [EASY] Quickshot Strat (17+s timesave) | Vent OOB Glitch (13+s timeloss) | Non-Lethal Strat (17+s timeloss*) | Legacy Strat (23+s timeloss*) |
| / | / | Killing Gene with early headshots - only worthwhile on Easy | A much safer way to take on Gene - Using a Glitched Box Equip to go OOB - Equip C Box before starting the run | Pacifist! - *less timeloss on EASY/NORMAL | 2022's go-to strategy pre-cheese - *less timeloss on EASY/NORMAL |
| | | | | | |