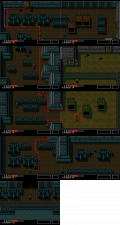
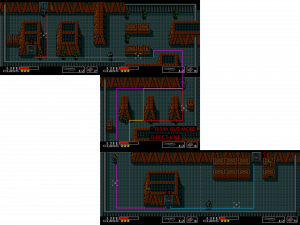
Any% PS2/HDC NTSC & PAL Route
Any% can be played on the PS2 port of Metal Gear (1987) which was included on disc 2 of Metal Gear Solid 3: Subsistence. Additionally, it is playable on PSTV/PS Vita, and modern consoles that can play the HD collection version of Metal Gear Solid 3. The game is also available on PC via a release on GOG.
Any% PS2/HDC Video Tutorial
Check out the full playlist:
https://www.youtube.com/watch?v=h338ZW9ky60&list=PLp02-dI93qVTK_7DlkRm6vyNiIlFNATT5
Building 1
Building 1 - Ground Floor
Video tutorial
https://www.youtube.com/watch?v=Ae5wG_v3mHQ&list=PLp02-dI93qVTK_7DlkRm6vyNiIlFNATT5&index=2
Click the image for a full resolution view
Grab Level 1 Card & 6 rations
- Walk up, then hold right and go up next to the tank. Before leaving the screen walk right.
- Hold up and walk right to meet the truck screen
- walk to the center truck first and grab the level 1 card
- exit the truck and enter the left truck
- grab 6 rations, walk out of the truck in between to have the rations respawn
- after the 6th ration, open the menu and close it again to have the level 1 card equipped
- walk left screen (extend to pink line for guaranteed chance to not get shot)
- walk top and enter the elevator
- take the elevator up (only one option)
Building 1 - Floor 2
Video tutorial
https://www.youtube.com/watch?v=vy2qBzlNSBg&list=PLp02-dI93qVTK_7DlkRm6vyNiIlFNATT5&index=3
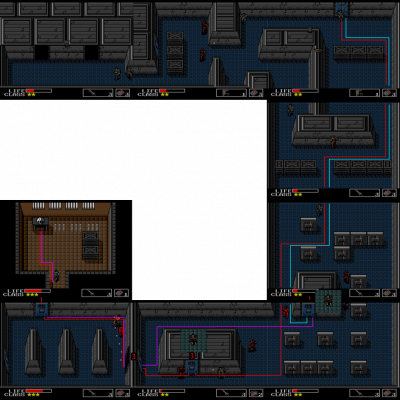
Click the image for full resolution view
The biggest floor in the entire speedrun. Let's break it down!
First Gas Room
- Hold down as you leave the elevator, turn left close to the wall and leave the room south
- hold down, then left close to the left side wall
- enter the door with level 1 card key, which you already have equipped
- hold left, turn down close to the wall
- hold down and touch the hostage
- hold right to enter the gas room
- in the gas room walk up, then menu to the ration
- L2 - DOWN - L2
- walk close to the walls
- once the ration has been auto used, switch back to the level 1 door card
- L2 - UP - L2
Death Barrel Room
It is not worth resetting the pin
- after the gas room, hold left
- enter the lower door to save the hostage
- leave the hostage room
- switch to the ration on your way right
- depending on RNG this ration may not be used until after the level 2 card door
- in the death barrel room hold up and go to the left gap
- grab the explosives
- walk down to the center again
- wait for the barrel to roll left
- once the barrel has rolled left, walk up and exit to the right
Grabbing Level 2 Card
- exiting the death barrel room, prepare to hold up and then right
- stay at the top wall when walking right
- before you reach the right side end of the level, a ration should be used up automatically
- after the ration has been used, switch to the level 1 card
- L2 - Up - L2
- enter the room at the bottom right
- once you grabbed the door card, menu to the ration again
- L2 - DOWN - L2
Meeting 4 Horsemen
- walk up and turn left before leaving the screen
- walk through the electrified floor
- switch to the level 1 card after the ration has been used
- L2 - Up - L2
- walk right to save the hostage
- enter the hostage room up, then right, walk the same path out again
- once leaving the room, switch to the level 2 card
- L2 - Down x2 - L2
- follow the light blue line to get into the 4 horsemen room
Leaving Floor 2
- once in the 4 horsemen room, walk up to the center, turn right
- on turning right, menu to the level 1 card
- L2 - Up x2 - L2
- walk right into the room to grab the grenade launcher, go down then left, leave the room
- back in the 4 horsemen room, switch to the level 2 card
- L2 - Down x2 - L2
- leave the room
- follow the light green line to save the final hostage on this floor
- leave along the orange line and follow it to the top right elevator
- take the elevator down 2 floors
Building 1 - Ground Floor Capture
Video tutorial
https://www.youtube.com/watch?v=zo2A_hMbbr4&list=PLp02-dI93qVTK_7DlkRm6vyNiIlFNATT5&index=4
Click the image for a full resolution view
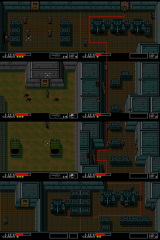 Key points: save 2 hostages, get captured
- walk south, curve the tanks to the left preferably
- hold down the left wall
- enter the hostage room and hold left
- turn up when reaching the hostage to actually save them
- leave to the right
- walk south
- switch to level 1 door card
- L2 - Up x2 - L2
- save the hostage, again hold left and up once reaching hostage
- leave the room and follow the line to get captured
- stick close to the walls / tanks for clean lines
Building 1 - Underground
Video tutorial
https://www.youtube.com/watch?v=1zEaSZVTs-4&list=PLp02-dI93qVTK_7DlkRm6vyNiIlFNATT5&index=5
Escape the cell and rescue Gray Fox
- walk left into the wall
- punch 5 times to open the wall
- hold left and go down to touch Gray Fox at his left body half
- after the convo walk down and punch the wall 5 times again
- go right into the Shotmaker fight
Shotmaker
Ignore Shotmaker!
Escape Underground
- walk to the bottom right door and punch it
- walk down and right to grab your items
- menu as follows to remove the tracker and equip the door 2 key card
- L2 - Up 2x - Circle - Up - L2
- walk out of the right room and enter the left room
- grab the door key level 3 card
- grab the ammunition
- leave the room and return to grab more ammunition
- in total: grab 5 ammo boxes, the result should be 5 explosives and 30 grenade launcher ammo
- before leaving the final time, menu to the door level 3 card and the explosives as follows:
- L2 - Down - R2 - Up - R2
- then leave the Shotmaker fight by walking through him
- the line will enable you to only take 2 times damage
- exit to the right into the maze
Maze
the maze is very simple, key points are to grab the blast suit and the enemy uniform
Save time by placing bombs early:
- walk up to the marked wall and place 1 explosive
- YOU CAN STAND ON EXPLOSIVES, THEY WON'T DAMAGE YOU
- follow the line on the map to the top left corner
- set another explosive and walk into the blast suit room
- follow the path back again to the beginning and walk up
- about 3/4 of the center screen, set an explosive at the left wall
- grab the enemy uniform and then leave to the elevator top right of the map
A note on dogs in this maze
- a dog will chase you, if a dog is still present on the previous screen before screen transition
- a chasing dog will stay on its axis (vertical or horizonal is depending on which direction you go)
- you can avoid dog damage by following the line on the map, however it is faster to stay close to the walls in room 4 towards room 2
- only the room 4 to 2 red line will lose you time by extending our walking path further right
Building 1 - Floor 1
Video tutorial
https://www.youtube.com/watch?v=XewdhZNx1YY&list=PLp02-dI93qVTK_7DlkRm6vyNiIlFNATT5&index=6
Meet Machine Gun Kid
- walk south and follow the line on the map
- trip the laser and floor wide alert by going south and then left
- keep going down and hold left
- enter the room to save another hostage
- walk left and use your door key level 3 to enter machine gun kid's room
Machine Gun Kid
- Ignore Machine Gun Kid
- At some point entering or exiting, a ration will most likely need to be used
Parachute and Hostage
- Walk up in the boss room and menu to the door card level 1 as follows:
- L2 - Down x2 - L2
- walk up to grab the parachute and leave the machine gun kid boss room
- if close to death, tapping up during exit will avoid MGK's hitbox
- try to exit as quickly as possible to only get shot once by MGK
- walk up and then right in the next room to not alert the guard
- save the hostage and leave to the left going up
- with the laser traps trip the alert again with the center box
- before reaching the elevator menu to the blast suit and grenade launcher as follows:
- L2 - Up - Right - R2 - Up - Right - R2
Building 1 - Roof
Video tutorial
https://www.youtube.com/watch?v=xFyfBuzec-g&list=PLp02-dI93qVTK_7DlkRm6vyNiIlFNATT5&index=7
Roof
- Walk south and left before leaving the screen
- hold left until reaching the bridge
- follow the path south
- on the opposite end of the map you can take off the blast suit
- L2 - Down x2 - L2
- walk right and before entering the hind fight, walk south to be on the top right corner level of the box
Hind-D Fight
- Walk right and shoot 20 times with the grenade launcher
- once the last grenade has left the launcher you can keep holding right, no damage
- walk up and left to fall off the roof - MAKE SURE TO HAVE THE PARACHUTE EQUIPPED!!!
Building 1 - Ground Floor
Video tutorial
https://www.youtube.com/watch?v=sqgPSGkvKP0&list=PLp02-dI93qVTK_7DlkRm6vyNiIlFNATT5&index=8
Click the image for a full resolution view
Level 4 Key and Rank Up 2
- once landed walk south
- hold right to enter the truck - don't walk too far south or else you take mine explosion damage
- grab the level 4 card key
- leaving the truck hold left
- you WILL take damage from the mine explosion, make sure to have enough health before
- walk up, equip the newly acquired level 4 door key card
- L2 - Down - L2
- enter the hostage room, get the 2nd rank up and leave the first building as the map guides
Building 1 to 2
Video tutorial
https://www.youtube.com/watch?v=lysJn4y5-yE&list=PLp02-dI93qVTK_7DlkRm6vyNiIlFNATT5&index=9
Click the image for a full resolution view

ideally you have 2 or 3 rations left after building 1, you can risk to continue with less
Case 1: you need more rations
- Walk right until you are between the grenade launcher and the ammo count
- then walk up until you meet the truck
- grab as many rations as you need
- exit the truck to the left and keep going up until you meet the tank
Case 2: you have enough rations
- Walk up along the right side of the truck
- walk right before getting to the end of the truck to not hit the mine
- keep going up at the center of the screen
- when meeting the tank, walk right before the 2 smaller boxes to bait the tank into shooting his lmg
Case 3: you need more plastic explosives
- Immediately head left and enter the leftmost truck for a set of explosives
- return to Case 2 directly or Case 1 by wrapping off the left side of the screen
Tank
- Walk to the right side of the tank
- walk up, punch or wait
- once shot, walk through the tank
Entering Building 2
- after passing the tank, go up and right until you're between the grenade launcher and ammo count
- switch to the uniform as follows
- L2 - Up x2 - L2
- pass the guards
- switch back to the level 4 card
- L2 - Down x2 - L2
Addendum - more Tank Skip approaches and lines
Building 2
Building 2 - Ground Floor
Video tutorial
https://www.youtube.com/watch?v=auuRPjBj1lI&list=PLp02-dI93qVTK_7DlkRm6vyNiIlFNATT5&index=10
Bulldozer
- Walk up to the bulldozer fight
- hold up to be close enough and send off 4 shots
- then walk to the south of the room before opening the door
- turn up and send off 4 more shots
- be aware if you go up while the bulldozer is exploding, the hitbox lasts a bit longer and you die on touch
- leave the boss room going up
Antenna
- Leave the bulldozer room immediately to the right, then up
- follow the path on the map to go to the Antenna room
- before entering switch to the door level 2 key card
- L2 - Left - L2
- grab the antenna by going up, then leave the floor towards the elevator
- take the elevator up 2 levels
Building 2 - Roof
Video tutorial
https://www.youtube.com/watch?v=Q667_QYXz48&list=PLp02-dI93qVTK_7DlkRm6vyNiIlFNATT5&index=11
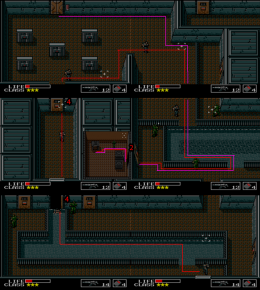
Welcome to Hell Roof
Click the image for a full resolution view
- Walk south and rescue the hostage
- leaving the room walk right and equip the level 4 door card
- L2 - Right - L2
- follow the path south to get to the room holding the level 5 door card
- the PINK line is protecting snake from some bullets
- the GREEN line has the mixture of direct line and partial protection from incoming damage
- the RED line is more risky, but also more direct and saving frames
- enter the room to grab the level 5 card
- menu to the level 5 door card
- L2 - Down x2 - Right - L2
- or right, then down twice
- leave the floor and take the elevator ALL THE WAY DOWN
Building 2 - Underground
Video tutorial
https://www.youtube.com/watch?v=n_-6Z2krI50&list=PLp02-dI93qVTK_7DlkRm6vyNiIlFNATT5&index=12
- Walk left and rescue the hostage
- walk south and open the door
- either continue to the next room or menu before entering
- equip ration and explosives
- L2 - Left 2x - Down 2x - R2 - Left - Down - R2
- walk north and go to the spot at the wall
- place plastic explosive next to the wall and open it
- switch to level 1 door card
- L2 - Up - L2
- go up and save the hostage
- walk east and equip the level 5 door card, this is where you should use up all rations
- the menu is now for when you have no more rations left and all items moved up one place in the inventory
- L2 - Up x2 - Right - L2
- Ignore the fake Dr. Madnar
- walk left and in the next room grab the door level 6 card
- equip the door level 6 card
- L2 - Down - Right - L2
- exit and enter the left door to meet Fire Trooper
Fire Trooper
Ignore the fire trooper and walk past him going north, then east, enter the elevator
Take the elevator UP 2 Levels
Building 2 - Floor 1
Video tutorial
https://www.youtube.com/watch?v=mnCdAPwm_NE&list=PLp02-dI93qVTK_7DlkRm6vyNiIlFNATT5&index=13
Another more complex floor, lets break it down
Rank 4 and Death Abuse
Click the image for a full resolution view
- walk right and down in the first room
- walk down and go right to the brads
- walk south and go right, keep hugging the boxes from the bottom
- switch from door key level 6 to 5
- L2 - Up - Left - L2
- Enter bottom right door
- you can avoid getting spotted by doing clean lines close to the wall
- Go through left entrance to rescue the POW
- Exit the POW room to the south
- Exit north back to Brads room
- then in the Brads room take the door to the right wall (still on level 5 door card)
- before going up, menu to door key level 3
- L2 - Up - Left - L2
- enter the top left room, save the hostage and rank up the third time for rank 4
- leave the room, press select, go to frequency 120.48
- if you died before, you need to go from 120.00, if you didn't die before yet, you go from 120.80
- after ending the codec, L2 and equip door key level 6
- L2 - Down 2x - Right 2x - L2
- walk right to go to the room with the rocket launcher, grab it and go out again
- once outside menu to the rocket launcher and the door key level 5
- L2 - Up - Left - R2 - Left - R2
- walk out to the left
- walk down
- walk right (hope that johnny isn't falling asleep)
- enter the death barrel room and go into the elevator
Death Abuse
On easy difficulty, if you die five times in one checkpoint, you get all your weapons unlocked, maximum ammo for the rank you have and full rations. This mechanic is coming in here for the first and only time as it stands.
- so enter the elevator to set your checkpoint
- turn right and in the death barrel room
- hold left to immediately die
- casual mash circle to continue as fast as possible
- redo 5 times
as soon as you hear the unlock ring sound, you got 60 rocket launcher ammo and a full stack of rations. Once the death farm is completed, you can leave the death barrel room to the south and come back to the floor for the rest of the events.
Brads and Compass
Video tutorial
https://www.youtube.com/watch?v=XVWTM8b89D8&list=PLp02-dI93qVTK_7DlkRm6vyNiIlFNATT5&index=14
Click the image for a full resolution view
- start going south and shoot a rocket for a floor wide alert
- this will prevent johnny from falling asleep and eliminating the chance to lose time
- go back to the brad room and get ready to shoot
- each brad takes 5 rockets to die
- on entering the brad room, tap left and start shooting, don't go up and then left
- once the first brad is down, go top right to the top wall and shoot left
- once the 2nd brad dies, the level 7 card key drops, grab it and equip door key level 2
- L2 - Up x2 - Left - L2
- enter the top right door, follow to the top right room
- call Jennifer via the saved codec frequency list, she will open the door
- follow to the top right door and grab the compass
- return to the bottom elevator room where you used death abuse
- take the elevator down a SINGLE floor
Is it faster to get the compass before or after death abuse?
Testing the two versions side by side gave a difference of 6s in favor of the late compass.
Building 2 - Ground Floor
Video tutorial
https://www.youtube.com/watch?v=jtfn0zQWYzM&list=PLp02-dI93qVTK_7DlkRm6vyNiIlFNATT5&index=15
Let's split this floor into two parts
Scuba Skip
Click the image for a full resolution view
- follow the path to the large aqueduct, avoiding damage if possible to avoid an extra ration use
- before you enter the aqueduct, make sure to heal yourself so you have the full health bar available
- swim up; if snake was not at full hp, he will die during this swim
- exit the water and follow the shown path
- do not switch to the door level 7 card until your ration has healed you
- before you head into the coward duck room, menu to the door level 7 card
- L2 - Down - L2
Coward Duck
- enter the room, skip the dialog and time your shots
- the best method is to hold skip and fire at the same time
- 2 shots from the rocket launcher and CD is dead
- grab the level 8 card while the 2nd rocket is still flying
- do not fall into the pit in the middle of the room
- then leave down again
Click the image for a full resolution view
Ending Building 2
- leave to the south again the same way you came up, make sure to be fully healed
- when reaching the south end heal up and equip the level 7 card
- L2 - Circle - Down - L2
- exit the building to the left
Building 2 to Building 3
- once in the desert hold left until your on the left side of the door you just exited
- hold up and enter the next screen and equip the compass (optional on first screen)
- hold up until you are on the empty screen three screens later
- menu to the explosives and door card level 7 again
- L2 - Up - R2 - Right - Up - R2
- keep going up until you enter building 3
Building 3
Video tutorial
https://www.youtube.com/watch?v=d9j9Zje90cE&list=PLp02-dI93qVTK_7DlkRm6vyNiIlFNATT5&index=16
Building 3 - Ground Floor
- enter the room and go top, walk right to blow up the wall
- Blue line: you can keep walking north and sticking close to the north side boxes going to the elevator
- Red line: you have to leave the room on the left hand side and walk up, left at the top of the boxes and then go into the elevator
- once the elevator starts moving down heal up and go to door card level 8
- L2 - Up - Circle - Up x2 - L2
- follow the elevator all the way down
Different line comparison video
Building 3 - Underground
Click the image for a full resolution view
- On the elevator, heal yourself going up once, heal, then go up twice for card key 8
- follow the path until you reach the wall to explode
- place the explosive, menu to and use a ration and then equip card 1
- L2 - Up x2 - Circle - Left x2 - L2
- once you pass the new open wall, hold up briefly and turn right immediately
- follow the wall up to not fall into the pit and continue
- pass through the next room to the electric floor
- hold up and switch to the ration when you turn right
- L2 - Right x2 - L2
- then enter the Metal Gear TX-55 boss room
Building 3 - TX-55
Video tutorial
https://www.youtube.com/watch?v=A5_LSN6gC9c&list=PLp02-dI93qVTK_7DlkRm6vyNiIlFNATT5&index=17
The order of legs to place the explosives in front of:
RRL, RLL, RLL, RRL, RLR, R
| 1 | Right | Right | Left |
|---|---|---|---|
| 2 | Right | Left | Left |
| 3 | Right | Left | Left |
| 4 | Right | Right | Left |
| 5 | Right | Left | Right |
| 6 | Right |
Do NOT menu to the rocket launcher before the last explosive has gone off or the explosive will despawn. Menu for rocket launcher is L2 - Left - L2
Building 3 - Big Boss & Escape
Video tutorial
https://www.youtube.com/watch?v=ViOMqcIrLLI&list=PLp02-dI93qVTK_7DlkRm6vyNiIlFNATT5&index=18
Big Boss Speech D-Pad spin vs Holding X
A semi-reliable way to skip Big Boss's speech even faster
Click the image for a full resolution view
- walk up and turn left
- shoot the first rocket
- continue walking left to the bottom left corner of the center box
- shoot 3 more rockets until Big Boss is dead
- move out of the room
- walk up the most left ladder
I'm no Rookie for MGX
Any% RTA Tutorial Session by SrgtSilent & Hau5test
Handy Tools
if you need a handy overview of which cards to use, check out this separate page
Card Notes based off Eriphram's Any% Route
shoutouts to Ndarren87 for his original notes
How to Setup the Livesplit autosplitter for PC/PCXS2
How to Setup AutoSplit Tool for console players
