This is an old revision of the document!
Big Shell: Pre-Stillman
Strut A Deep Sea Dock
Strut A Roof
Strut A Pump Room
AB Connecting Bridge
Strut B Transformer Room
BC Connecting Bridge
Strut C Dining Hall
Big Shell: Bomb Disposal Segment (Part 1)
Strut C Dining Hall
BC Connecting Bridge
Strut B Transformer Room
AB Connecting Bridge
Strut A Pump Room
FA Connecting Bridge
Strut F Warehouse
EF Connecting Bridge
Strut E Parcel Room
Strut E heliport
Strut E Parcel Room
Strut C Dining Hall
CD Connecting Bridge
Strut D Sediment Pool
DE Connecting Bridge
Strut E Parcel Room
Strut A Pump Room
Strut A Roof
Strut A Deep Sea Dock
Boss Fight: Fortune
Big Shell: Bomb Disposal Segment (Part 2)
Strut A Roof
Strut A Pump Room
FA Connecting Bridge
Strut F Warehouse
EF Connecting Bridge
Strut E Parcel Room
Strut E heliport
Boss Fight: Fatman
Big Shell: Heading to Ames
Strut E heliport
Strut E Parcel Room
EF Connecting Bridge
Strut F Warehouse
EF Connecting Bridge
Shell 1 Core, 1F
Shell 1 Core, B2 Computer Room
Shell 1 Core, B1
Shell 1 Core, B1 Hall
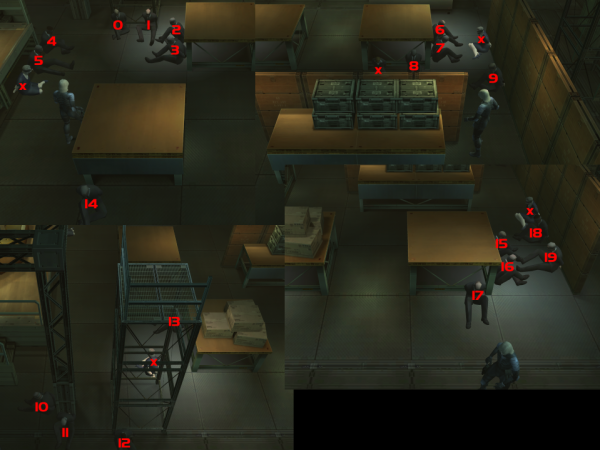
- <html><span style=“color:SandyBrown”>NG:</span> Ames will always spawn in the same position, which is spot #14 on the photo below. <br></html>
- <html><span style=“color:SandyBrown”>NG+ and NG++:</span> Ames can spawn in 20 random positions and the game determines this the moment the player enters the Shell 1 Core, B1 Hall for the first time. <br></html>