No Major Glitches
Also known as Glitchless
A full video tutorial for beginners wanting to run the console / emulator version of Metal Gear Solid on easy difficulty - without using any major glitches.
Before the Run
- Select English on Integral to save 7 seconds at Nuclear statistics!
- Weapons Glitch is naturally not allowed in the glitchless category
Dock
- Unless you are going for Rank 1 or Big Boss, you want to farm alerts in the Dock.
- There are many possible variants to the Dock, but only one thing is required. You must alter right guard's path, or kill him. If you do not, you will not be able to get on the elevator quickly (assuming stealth).
- If you alter the left guard's path, you must alter it further or kill him. Unaltered, he leaves the elevator area just before the elevator arrives (assuming stealth).
- You can use the credits as visual cues for stealth. Head up the left path when CG Artists Takashi Mizutani and Hideki Sasaki appear. The final credit is Assistant Director Yoshikazu Matsuhana.
- Instead of knocking on the wall, you can let the elevator guard exit. This is slower.
Heliport
- Initial dpad movement is simple and the same on every difficulty to manipulate the Helipad guard
- Quick equip Chaff on Heliport Pickup if you performed RAM Manipulation
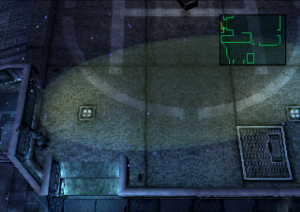
- Stealthy position at the searchlights
Tank Hangar
- If you do not hold up on the analog for the Miller call, Snake will stop crawling. Be sure to move forward on the analog stick at the end of the call, so you won't stop. Feel free to switch to Dpad afterwards if you prefer.
Cell
- As you approach the DARPA Chief vent, mash circle to enter the vent as early as possible (Vermillion Vent)
- Quick equip Card in Cell if you performed RAM Manipulation
Guard Encounter
Armory
Armory South (Revolver Ocelot)
Grenade Ocelot Tutorial for all difficulties
Armory
In the armory south room you can not reach Meryl, walk to the armory first, then codec call 140.15 to reach Meryl. Once you step into the elevator and go to the Tank Hangar, she will begin opening the tank hangar door.
Tank Hangar
Lasers in the Tank Hangar are always on the same cycle, but change speed depending on the chosen difficulty.
Video example on Normal:
Video example on Extreme:
Extreme Tank Hangar Cycle Example
- Have cigarettes equipped before going into the elevator
- once codec and cutscene are over, walk down and directly bottom right, keeping at the wall.
- Walk straight through laser one - wait for laser two to go up
- walk through laser two, wait for laser 3 to go up
- then walk past laser 3,4,5
- equip door key.
Canyon (Tank)
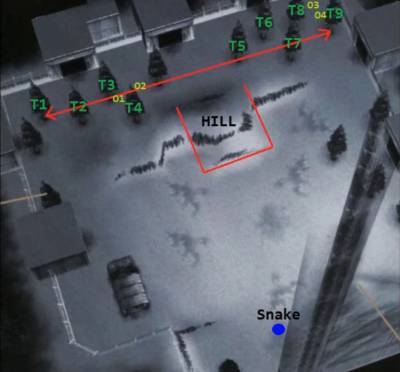
- For avoiding the mines
Nuke Bldg 1F
- Analog Buffer is equip Chaff when going to crawl, PP,P
- DPad Buffer is equip Chaff when going upleft at 3rd shadow
Nuke Bldg B1
Nuke Bldg B2
Lab (Ninja)
Nuke Bldg B2
Nuke Bldg B1
Psycho Mantis
- 20 socom shots, 101 famas
Cave
Underground Passage
PSG-1 Backtrack
- If you knock on the wall under the pipes (where the trap door is) the time it takes snake to run down with no weapon is exactly the same time it takes until you flip him. Should be golden everytime
Wolf 1
Medical Room
- Begin video at 2:12 for All Bosses.
- If you need to take a bathroom break, call Colonel early, mash through the codec, then wait by the door.
- You will need to mash through the longest codec in the game in All Bosses, good luck!
Communications Tower A
- Halfway up Flight 4 (optional)
- The Landing of Flight 9 (The Frozen Door)
- Past the ration (when the grate disapppears)
- 2nd guard of Flight 11 (halfway up the flight)
- Just before Flight 14 (as you are passing the guard)
- Halfway up Flight 16
- Halfway up Flight 23 (optional)
Roof Communications Tower A
Tower Wall A
- In the rappel scene, if you hold down+jump while the cutscene is still going, you'll be able to jump at the first frame available. If you mash the jump button and you miss that frame, the codec call will interrupt your jump, forcing you to add another jump and lose a couple of seconds.
- Downleft, Downright, Downleft, Downleft, Down(Left/Right), Down(Left/Right)
Fast vs Damageless Rappel Strats (side by side comparison) https://www.youtube.com/watch?v=ZRXjrJCjZak
Extreme No Damage Rappel https://youtu.be/xd2B75Q2bIc
No Stop, No Damage Extreme https://youtu.be/PMmc52dDytg
raw no stop rappel w/o extra jump https://youtu.be/IPkzZJMNdoY
Rappel EX no stop variant https://www.youtube.com/watch?v=DaJRf6fB5So
girder momentum extreme https://youtu.be/tDjLVtlLdI8
New fastest rappel by around half second https://www.youtube.com/watch?v=wS5uEWz4Dnk
Extreme No Stop, No Damage Rappel (Haircut Variant) https://www.youtube.com/watch?v=2uQKFs0erlc
Walkway
Communications Tower B Ascent
- “Position your thumb at 10 o'clock while climbing the stairs, and 7 o'clock when descending. This way, you hug the exterior walls, run up the stairs in the most direct route, and don't become stuck or stalled on the banisters.” - Official Strategy Guide
Hind-D
Extreme Difficuilty, Damageless strategy by IceMan
Communications Tower B Descent
Grenade Turret Tutorial by Hau5test
4 Horsemen damageless tutorial by Iceman
Snowfield (Wolf 2)
Blast Furnace
- Throw the Stun at the orange shadow before the door
- You must shoot the catwalk guard before going to the wall to do an ideal strategy
- Nikita is the simplest to use to destroy the crane, line yourself up near the sidle point, fire up. Tactical Reload to destroy precisely
Cargo Elevator
Warehouse (Raven)
Warehouse North
Underground Base (Rex's Lair)
Underground Base 2
Underground Base 3
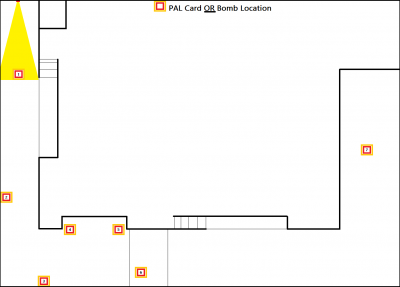
Drainage Ditch PAL Key (10+ Alerts)
- There are 7 spots the PAL Key (and Bomb) can spawn
- This only happens if you have 10 or more Alerts before entering the room
Rat and Room Temperature (Yellow)
- The rat can hear you shoot regardless of distance, so unequip with R1 to avoid this. For example, the rat is by the turret and you shoot by the stairs.
- Jumping into the ditch will spook the rat, regardless of distance.
Command Room (Computer Room)
Low Temperature (Blue)
High Temperature (Red)
MG-REX
Liquid Snake
- If you fall off the edge, you will die on Extreme
- During Phase 2, Liquid will counterattack even if you finish with a kick on Hard and Extreme
- You can PPK to finish Liquid off at 12 HP on all difficulties besides Easy
- You cannot throw Liquid to finish the fight if you knock him down with 0 HP on Normal, Hard and Extreme. Instead, PPK
Various 2, 1 and 0 throw setups
another bottom left side no throw setup by Tromboncino
Escape Route
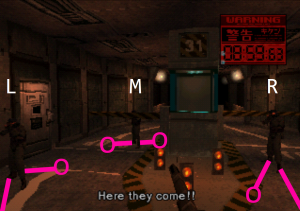
- Guards deal 100 damage (13%) in the parking lot on EZ, and 42 damage during the driving sequence
- 19 shots while driving will Kill Snake
- There are two bottlenecks in the Parking Lot sequence. Your ally will not say “Snake, hold on!” until 9:34.60 on the timer. Therefore, your time can be no faster than 9:31.66. Video example here!
- Aim at the corner of the metal for Checkpoint 1
- Aim at the corner of the door to the left after Checkpoint 2 to aim for the left guard
- Guards take 7 shots each on EX
Liquid Jeep
- Liquid Jeep - 31
- Phase 1 (Swerve 1) - 6
- Phase 2 (Tunnel Bumper) - (2 transition) 5
- Phase 3 (Swerve 2) - 5
- Phase 4 (Columns) - (2 transition) 6
- Phase 5 (Side by Side) - 5 [13 total for phase 4 and 5]
