MGS:PO New Game Any% Routes & Guide
Goal: Start a new save file and complete the game as fast as possible
Pre-Run
Useful Knowledge
It is preferable to play on a PAL release
as noted here, but this guide also includes additional info and strategies for NTSC whenever necessary (Silo Complex)
If you wish to change any options such as your aiming sensitivity or controls, do so before creating your New Game save file
One line of Non-Codec text/dialogue needs to be skipped before you can hold Triangle to fast forward through the rest of it
If you don't receive a Spy Report that is necessary to advance the game after using your Waits, deploy to any location and abort the mission to progress time further
If you desperately need to heal up or refill your Stamina, you can use Waits to recover all characters' Health & Stamina Gauges by around 33.33…%
Holding the Movement Stick in any direction while loading into a stage will make your character face that direction - Keep it in a neutral position to avoid this from occuring
In rare cases, pointing towards a specific direction can help save some frames (e.g., Silo Entrance I., II. & III.)
Noteworthy Techniques and Notations
Advance Point (AP): The “exit” of a level, which either takes you to the next area or back to the Briefing Menu
CQC Hold Up: Perform a CQC slam and (auto-)aim your weapon at the enemy to immobilize them
180°-Bump-Grab (180-BG): Run & bump into a soldier from the front, then once you’re behind him, perform a 180° turn and grab him - This also works while having the C Box equipped
Push-Drop: With a person in your chokehold, aim the stick in a direction and press Square to push them to the ground - This gives you an opening to escape out of their sight
Roll-Knockdown (RKD): Bump into or run just next to a guard and perform a roll in the direction you want to continue in - This pushes them just out of range to spot you once they've recovered
Notes Regarding Difficulty-Specific Strategies
While the main route presented in this guide is based on the NORMAL Difficulty, most of these strategies and routes work identically on their EASY counterparts.
If there are exclusive alternatives available to either Difficulty, they will be marked by the following tags: [EASY], [EASY-only] & [NORMAL-only].
All of these occurences are also listed below:
| Stage | Routing Change |
| Hospital | EASY: Guard has much lower stamina → “PP-PPK Route” is recommended |
| Airport | EASY: No terminal guard → Make use of the “Direct Route” instead |
| Silo Entrance III. | EASY: No need for additional Stun Gs → Use the “Straight2Complex Route” |
| Silo Complex | NORMAL: Additional guard in front of locked door #2 → Alternative “2-Codec Route” is now viable |
All bosses deal less damage, but otherwise behave in the exact same manner on EASY. The other important difference lies in the amount of health & stamina that you can drain per hit.
This is usually1) increased by 50% on EASY. All in all, this enables EASY speedruns to finish just over a minute earlier than a NORMAL run would.
The fastest boss strategies for EASY are listed below:
| Python | Null 1 | RAXA | Null 2 | Cunningham | Gene |
| | | | | | |
[I] Escape & Diversionary Operations
[1.1] Prison
Standard Route
Skip (Start) Cutscene
Attempt to open the cell door - ideally with the Double Handle Grab
Fast forward (Triangle) Text
Skip Text
Enter the crawl space below the bed and follow it to the right
Get up as you exit the space beneath the bed (don't hold X, tap it) and pick up the Mk22
Skip Text
Skip Cutscene
Fast forward Text
Head to the door on your left
Fast forward Text
Go inside the main building and roll into prone position to get past the gate
Pass the patrol in front of you from the right and continue northeast
Roll up the slope, follow the left path and roll into the Advance Point (AP)
Double Handle Grab
You can skip one of the cell door handle grab animations here. In order to do that, you need to run towards the door's handle in a way that places yourself just out of range to normally initiate the door opening animation when pressing the action button.
If properly executed, this precise trick makes one handle grab count as two or more and therefore advances Snake straight to the text box.
The skip was discovered by Pythonicus during his first full speedrun!
[1.2] Comm Base I.
Standard Route
Fast forward Text
Head right and roll past the gap behind the iron fence
Enter the main building through the eastern red door in front of you
Open the next door and step into the AP
Fast forward Codec Call
Fast forward Codec Call
Skip Cutscene
| Action | Input |
| Fast forward Dialogue | |
| Select Soviet Patrol Base | |
| Fast forward Dialogue | |
| Start Mission | |
Alternative Routes
| Legacy Route (<1s timeloss) | | | | |
| Marginally slower, but extremely safe | | | | |
| | | | | |
[2] Soviet Patrol Base I.
Standard Route
Skip Cutscene
Take a few steps towards the west
Fast forward Codec Call
Roll right through the Text Trigger north of you
Skip Text
Head northwest and roll down to the lower area
Ascend the northern staircase and continue towards the next lower area
Roll diagonally over the gap onto the path next to the building
Head inside and perform a Roll-Knockdown (RKD) past the officer and into the Secret Document
Fast forward Codec Call
| Action | Input |
| Fast forward Dialogue | |
| Select Supply Depot | ↑ |
| Fast forward Dialogue | |
| Start Mission | |
Cutscene/Text Triggers
Cutscene or Text Triggers like the one here temporarily block you from moving. If you enter the trigger area with a roll, your animation will carry you a bit further.
Alternative Routes
| Crate Roll Route (<1s timesave) | Ultimate Precision Route (2+s timesave) | | | |
| Semi-precise optimization | Near TAS-like precision needed! - not recommended! | | | |
| | | | | |
[3] Supply Depot I.
Standard Route
Fast forward Codec Call
In front of you, climb up one box and roll onto the concrete
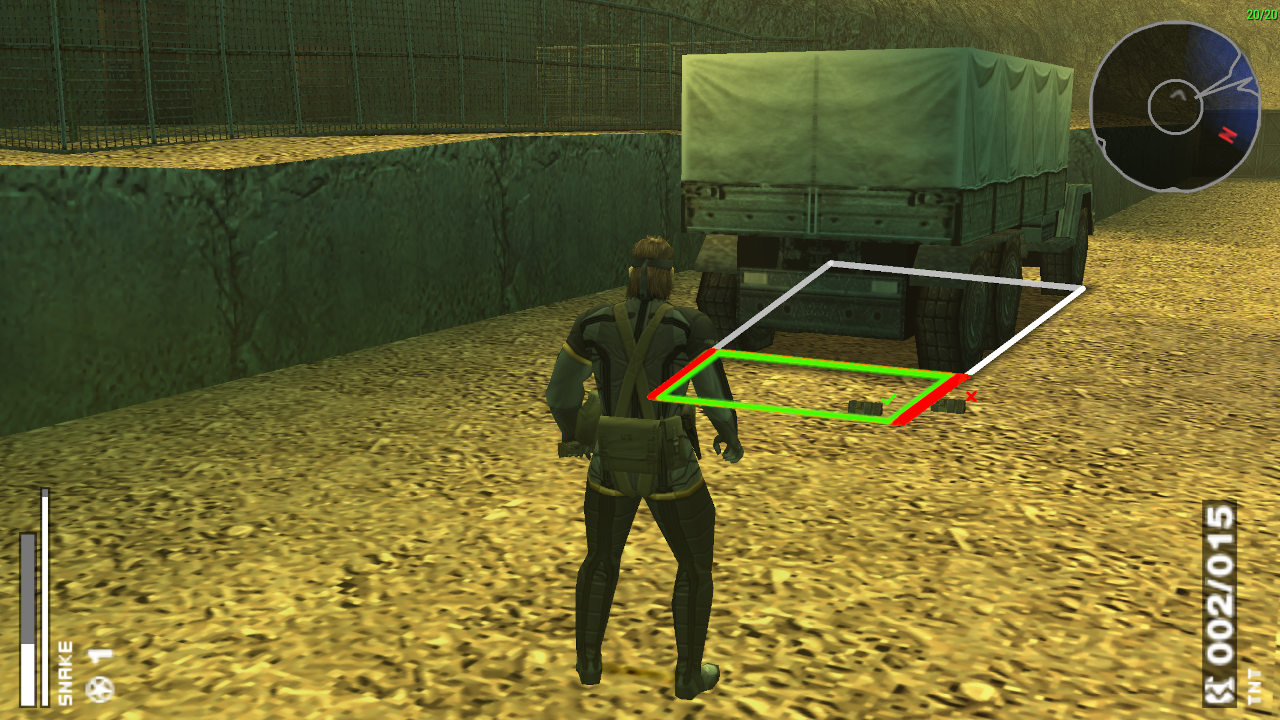
Walk alongside the building, towards the soldier guarding the entrance (Jonathan)
Perform a quick CQC slam and pick up the TNT inside, next to the ramp
Pick up and drag Jonathan to the stacked boxes and enter First Person View mode (FPV)
Turn towards the southwest and drop him
Drop down yourself and continue dragging Jonathan to the back of the truck
Skip Cutscene
| Action | Input |
| Fast forward Dialogue | |
| Jonathan → Sneaking Unit - Team Alpha #1 | ← ↓ Square → ↓ Square Square ↑ Square |
| Select Comm Base | ↑ |
| Fast forward Dialogue | |
| Select Comm Base | |
| Fast forward Dialogue | |
| Start Mission | |
Inventory Bloat [1/2]
If you find yourself accidentally picking up unnecessary items such as the 9mm T Ammo dropped by Jonathan here, make sure to drop (Inventory, Drop [L]) or replace it at the next opportunity.
Inventory bloat can lead to additional timeloss later on so it's best to proactively prevent it from happening.
Truck Recruitment Positioning
Make sure to not drag soldiers too close to the truck's rear. Snake will always go towards a fixed spot, which is a certain distance behind the truck.
If you entered the trigger zone from an unfavorable position, you could lose valuable seconds due to longer animations.
Why Supply Depot?
While the game recommends you to go to the Soviet Patrol Base, you can actually visit any of the available stages to complete this recruitment mission.
We're simply recruiting this soldier on this stage, because he is closer to our truck and therefore faster to drag there than anyone else. The TNT pickup is an added bonus.
[4] Comm Base II.
Standard Route
Fast forward Codec Call
Fast forward Codec Call
Run straight into the central building via the western red door
Go through the next two doors to your front, left and into the AP
Fast forward Codec Call
| Action | Input |
| Fast forward Dialogue | |
| Select Hospital | |
| Fast forward Dialogue | |
| Start Mission | |
[5] Hospital
Standard Route
Fast forward Codec Call
Approach the gap of the wall in front of you with a roll into prone position
Pass the gap and follow along the right, around the central building
Perform a 180°-Bump Grab (180-BG) and choke the approaching guard unconscious
Pause close to the left wall and change your active member to Snake
Get to this spot as Snake, then drag & drop the future Recruit within Jonathan's box' range
Fast forward Codec Call
Keep going and enter the northwestern building
Roll up the staircase and finish off by entering the AP inside the second, rightmost room
Fast forward Codec Call
Skip Cutscene
| Action | Input |
| Fast forward Dialogue | |
| Select Research Lab | |
| Fast forward Dialogue | |
| Start Mission | |
Inventory Bloat [2/2]
If you find yourself accidentally picking up an item dropped by the Recruit here, make sure to drop (Inventory, Drop [L]) or replace it at the next opportunity.
Inventory bloat can lead to additional timeloss later on so it's best to proactively prevent it from happening.
CQC Slam vs. 180-BG
While performing a slam to knock out guards like this once can theoretically be faster, it comes with other drawbacks and risks. There's a very high chance that the soldier will have enough stamina to take one CQC slam without falling unconscious.
This chance is drastically lower, but still present on EASY difficulty. Additionally, you will be out of range to instantly pause and perform a Member Change without repositioning here, thus losing further time.
"Why recruit this guy at all?"
While it is technically possible to finish the run without any additional recruitments, the impact it would have on Spy Report RNG is huge. The chance of saving time by skipping this Recruit and relying on amazing Spy Report luck lingers in the one digit range (x%).
A Man Who Delivers
The soldier obtained after Jonathan (Recruit) will always have the Deliveryman skill.
Alternative Routes
[EASY-only] PP-PPK Route (3+s timesave) | | | | | |
| Exclusive to EASY - making use of the soldier's lower stamina | | | | | |
| | | | | | |
[6] Research Lab I.
Standard Route
Fast forward Codec Call
Pause the game and perform a Member Change from Jonathan to Snake
Follow along the path until you reach the upward slope with the guard next to it
Start ascending it and roll up twice to reach the top
From here, head north and then continue eastward onto the next slope
Perform another two rolls to the top, turn around and roll into the AP
Skip Cutscene
Fast forward Codec Call
Roll straight down to the door to enter the building
Take a right and roll into the final AP
Skip Cutscene
| Action | Input |
| Fast forward Dialogue | |
Confirm & fast forward Dialogue if Recruit persuaded here [1/4] | |
| Jonathan → Spy Unit - Supply Depot | Square → R R Square |
Recruit → Spy Unit - Research Lab [1/4] | @Spy Unit ← ← ↑ ↑ Square → → ↑ Square |
| Wait once for Supply Depot Report | |
| Read it & fast forward Dialogue | |
| Select Supply Depot | ↓ ↓ ↓ |
| Fast forward Dialogue | |
| Start Mission | |
Alternative Routes
| Swapless Route (2+s timeloss IGT/1+s timesave RTA) | | | | |
| Same route minus the Member Change | | | | |
| | | | | |
[7] Supply Depot II.
Standard Route
Fast forward Codec Call
Climb a box and roll onto the concrete, then go through the small building
Run past the guard while heading inside of the main building and continue towards the hall's back
Once you've reached the corner, roll onto the crates to obtain the Secret Document
Fast forward Codec Call
| Action | Input |
| Fast forward Dialogue | |
Confirm & fast forward Dialogue if Recruit persuaded here [2/4] | |
Recruit → Spy Unit - Research Lab [2/4] | @Sneaking Unit ← ↑ ↑ Square → → ↑ L L Square |
| Select Rail Bridge | |
| Fast forward Dialogue | |
| Start Mission | |
[8] Rail Bridge I.
Standard Route
| Action | Input |
| Fast forward Dialogue | |
Confirm & fast forward Dialogue if Recruit persuaded here [3/4] | |
Recruit → Spy Unit - Research Lab [3/4] | @Sneaking Unit ← ↑ ↑ Square → → ↑ L L Square |
| Wait for Supply Depot Report (or Research Lab Report) | |
| Read it & fast forward Dialogue | |
| Jonathan (or Recruit) → Spy Unit - Soviet Patrol Base | @Sneaking Unit → R R Square R Square (or ← ↑ ↑ Square → → R R R Square) |
| RECOMMENDED: Use up all your Waits (will improve Spy Report acquisition rate) | |
| Select Supply Depot (or Research Lab) | ↓ ↓ ↓ (or ↑ ↑) |
| Fast forward Dialogue | |
| Start Mission | |
Further Expanding Upon Great Report Luck [1/2]
If you find yourself in the uncommon situation that you already have two of the three necessary Spy Reports before launching into your first Diversionary Mission, you can expand on your luck even further.
In order to do that, assign both Jonathan and the Recruit to the leftover Spy Report location to boost its Report acquisition rate.
Order of Diversionary Mission Completions
For the TNT-blowup missions (9-A, 9-B, 9-C [& 9-D]) the order in which you read and complete the Spy Reports can help you save around a second by skipping some pre-deployment dialogue.
If you receive more than one TNT Report during a Briefing session, make sure to read the canonically later one first. Then, read the other one(s) and complete the last Report, which you've read.
The canon timeline looks like this: [Town >] SPB > RL > SD
Examples: If you get both RL & SD Reports, read RL first, then read and complete SD. If you receive Reports for SPB & RL, read SPB before reading and completing RL.
After finishing three of these missions, you can move on to [10] Rail Bridge II.!
[9-A] Supply Depot III.
Standard Route
| Action | Input |
| Fast forward Dialogue | |
Confirm & fast forward Dialogue if Recruit persuaded here [4/4] | |
Recruit → Spy Unit - Research Lab [4/4] | @Sneaking Unit ← ↑ ↑ Square → → ↑ L L Square |
If this was your 3rd Diversionary Op: Select Rail Bridge, fast forward Dialogue & start Mission | |
| Wait for Research Lab Report (or Soviet Patrol Base Report) | |
| Read it & fast forward Dialogue | |
| RECOMMENDED: Use up all your Waits (if this was your 1st or 2nd Diversionary Op) | |
| Select Research Lab (or Soviet Patrol Base) | ↓ ↓ ↓ (or ↓) |
| Start Mission | |
Further Expanding Upon Great Report Luck [2/2(A)]
If you find yourself in the uncommon situation that you already have two of the three necessary Spy Reports before launching into your second Diversionary Mission, you can expand on your luck even further.
In order to do that, assign both Jonathan and the Recruit to the leftover Spy Report location to boost its Report acquisition rate.
[9-B] Research Lab II.
Standard Route
Fast forward Codec Call
Follow along the route and ascend the slopes with three rolls
Enter the main building through the southern entrance
Inside, pass the guard blocking the path and enter the room to your right
Equip and plant the TNT closely in front of the generator, then trigger the detonation
Fast forward Codec Call
| Action | Input |
| Fast forward Dialogue | |
If this was your 3rd Diversionary Op: Select Rail Bridge, fast forward Dialogue & start Mission | |
| Wait for Soviet Patrol Base Report (or Supply Depot Report) | |
| Read it & fast forward Dialogue | |
| RECOMMENDED: Use up all your Waits (if this was your 1st or 2nd Diversionary Op) | |
| Select Soviet Patrol Base (or Supply Depot) | ↑ ↑ (or ↑ ↑ ↑) |
| Start Mission | |
Further Expanding Upon Great Report Luck [2/2(B)]
If you find yourself in the uncommon situation that you already have two of the three necessary Spy Reports before launching into your second Diversionary Mission, you can expand on your luck even further.
In order to do that, assign both Jonathan and the Recruit to the leftover Spy Report location to boost its Report acquisition rate.
[9-C] Soviet Patrol Base II.
Standard Route
Fast forward Codec Call
Head east and roll diagonally across the lower level to reach the path next to the building
Enter the building and run between the tables to reach the southeastern exit
Run past or bump into the guards on your way to the armoury in front of you
Equip, plant and detonate the TNT
| Action | Input |
| Fast forward Dialogue | |
If this was your 3rd Diversionary Op: Select Rail Bridge, fast forward Dialogue & start Mission | |
| Wait for Supply Depot Report (or Research Lab Report) | |
| Read it & fast forward Dialogue | |
| RECOMMENDED: Use up all your Waits (if this was your 2nd Diversionary Op) | |
| Select Supply Depot (or Research Lab) | ↑ ↑ (or ↑ ↑ ↑) |
| Start Mission | |
Further Expanding Upon Great Report Luck [2/2(C)]
If you find yourself in the uncommon situation that you already have two of the three necessary Spy Reports before launching into your second Diversionary Mission, you can expand on your luck even further.
In order to do that, assign both Jonathan and the Recruit to the leftover Spy Report location to boost its Report acquisition rate.
TNT Diversionary Operation... D?!
There is one more location in which you could perform a diversionary operation; Town! However, since it has by far the slowest route it is in no way viable for the run.
| Action | Input |
| Fast forward Dialogue | |
Fast forward Dialogue if Campbell says “Hey Snake…” here [1/5] | |
| Select Rail Bridge | |
| Fast forward Dialogue | |
| Start Mission | |
[10] Rail Bridge II.
Standard Route
Fast forward Codec Call
Head east to step onto the bridge's center and make your way straight across to the other side
After getting spotted by the patrol, stick close to the truck so you can dodge any melee attacks
Roll into the AP
Fast forward Codec Call
| Action | Input |
| Fast forward Dialogue | |
Fast forward Dialogue if Campbell says “Hey Snake…” here [2/5] | |
| Select Harbor | |
| Fast forward Dialogue | |
| Start Mission | |
Alternative Routes
| Diversionary Shot Route (1+s timeloss) | | | |
| Any Tsuchinoko run's go-to strategy | | | |
| | | | |
[II] New Friends, Loose Ends
[11] Harbor
Standard Route
Fast forward Codec Call
Head west, then south to pass the crates and continue towards the bridge
Roll onto the bridge, then cross it and go left to roll into the ship
Jump over the railing with a roll to drop onto the cutscene trigger below
Skip Cutscene
Fast forward Codec Call
Climb and roll past the crates towards the east into the text trigger
Fast forward Text
Roll further eastwards onto the floor and into the call trigger in front of the tarped crate
Fast forward Codec Call
Fast forward Codec Call
| Action | Input |
| Fast forward Dialogue | |
Fast forward Dialogue if Campbell says “Hey Snake…” here [3/5] | |
| Jonathan + Recruit → Spy Unit - Security Base | ← ↓ Square → → ↑ Square Square ← ← ↑ ↑ Square |
| Wait for Security Base Report | |
| Read it & fast forward Dialogue | |
| Select Security Base | ↓ |
| Fast forward Dialogue | |
| Start Mission | |
NTSC vs PAL
Unlike on PAL, the cutscene trigger won’t save you from taking fall damage in the NTSC releases.
Alternative Routes
| Sneaky Route (3+s timeloss) | Pick up M63 (7+s timeloss*) | | | |
| Strategies from this route can be mixed in as desired | Alternative to Jonathan's AK-47 and Stun Gs for Cunningham - *has a slim chance of saving up to 7s total on Cunningham | | | |
| | | | | |
[12] Security Base
Standard Route
Fast forward Codec Call
Head east, roll past the gap and enter the main building through the door behind the patrol
Reach the staircase around the left corner and use two rolls to pass the guard and ascend it
Enter the sliding door on your left and roll into the Secret Document inside of the room
Skip Codec Call
| Action | Input |
| Fast forward Dialogue | |
Fast forward Dialogue if Campbell says “Hey Snake…” here [4/5] | |
| Select Warhead Storage | |
| Fast forward Dialogue | |
| Start Mission | |
Alternative Routes
| Sneaky Route (2+s timeloss) | | | | |
| Strategies from this route can be mixed in as desired | | | | |
| | | | | |
[13.1] Warhead Storage
Standard Route
Fast forward Codec Call
Follow the corridor downward while sticking close to the left and continue into the big hall
Fast forward Text
Once inside, head left and run through the sensors past the officer
Grab the Mosin Nagant at the passage’s end and enter the nearby door
Run through the corridor until you reach the last slope before it turns right
-
Take a right and lie in wait close to the corner right of the door
When one of the guards approaches, comes to a stop and starts aiming at you, detonate the TNT
Once the knockback has pushed the guard towards the now unlocked door, step into the AP zone
Fast forward Codec Call
Try to plant the TNT
Skip Cutscene
Ensuring a Successful Infrared Sensor Bait
The infrared sensors present throughout the whole facility always run north/southwards and will alert everyone simultaneously once triggered!
For the Standard Route it does not matter if you prematurely get spotted by the female officer before arriving at the tunnel, however it is important to only trigger this one set of sensors.
If you trigger any other sensors beforehand or get kicked down by the officer, you can easily lose the Alert Phase and therefore your trail while continuing through the level.
Alternative Routes
| Simple Route (20+s timeloss) | | | | |
| The fastest option without planting additional TNT | | | | |
| | | | | |
[13.2] Python Boss Fight
Standard Route
Equip your Mosin Nagant and quickly land a no-scoped shot at Python as he charges at you
After landing a shot, look straight down at the ground with your Mosin equipped/in FPV to dodge Python’s retaliatory burst-fire
Once his invincibility-frames from your last hit have worn off, land another shot
Repeat the last two steps until his Stamina Gauge is fully drained (Easy: 1 headshot + 2 body shots, Normal: 2 headshots + 2 body shots)
Skip Cutscene
| Action | Input |
| Fast forward Dialogue | |
Fast forward Dialogue if Campbell says “Hey Snake…” here [5/5] | |
| Wait for Security Base Report | |
| Read it & fast forward Dialogue | |
| Jonathan → Sneaking Unit - Team Alpha #2 | ← ↓ Square → ↓ Square |
| Equipment (Jonathan): Unequip AK-47 | [] [?] [] [] |
| Equipment (Snake): Unequip Mosin N, equip AK-47 onto TNT | [Mk22] [AK-47] [] [] |
| Select Airport | ↓ |
| Start Mission | |
FPV Lookdown Exploit
Looking down while in FPV mode prevents most enemies' incoming fire from hitting you, This works, because looking down in FPV seems to turn your plane of a hurtbox parallel to the ground.
Since this strategy was discovered in 2017 by MarlonH8 it fundamentally made the game much easier than it was before - from both a speedrun and casual perspective.
Python's RNG
Python will react differently to incoming damage. Ideally, you'd want to see his long recovery animation that barely leaves any room for him to retaliate, but this is rarely the case.
"Safe" Python
[14] Airport
Standard Route
Fast forward Codec Call
Fast forward Codec Call
Enter the terminal area through the door in front of you
Roll behind the desk and pause the game to perform two Member Changes
OPTIONAL: If you're low on Life and want to heal up before Null, pick up and use Medical Kit S x 3
Assign Snake to “Point 1” (behind the wall) and swap to Jonathan
Pause the game once more to swap right back to Snake
Equip your Mk22, approach the ramp in front of you and roll upwards twice
While running, shoot slightly left into the western wall at the ramp's summit to spook the guard above
Head across the room and once again perform two rolls to ascend into the control room
Approach the politician in the northwest corner while starting to sneak 3 floor patterns behind him
Grab him and start the interrogation
Fast forward Codec Call
| Action | Input |
| Fast forward Dialogue | |
| Wait until Daytime if necessary (Stun G only spawns at Day) | |
| Select Silo Entrance | |
| Fast forward Dialogue | |
| Start Mission | |
The Terminal Guard
Depending on when and where you shoot to spook the upper soldier he may switch his position to either next to the terminals or the northern, eastern or southern side of the pillar to call for backup. A quick hold up while passing by helps elminate the possibility of him spotting you.
Top to Bottom Lure Strat
Alternative Routes
[EASY-only] Direct Route (1+s timesave) | Risky Route (1+s timesave) | Classic Solo Route (9+s timeloss) | | | | |
| Exclusive to EASY - no terminal guard | The soldier can easily shoot the official, therefore failing the mission | No member-swapping involved! | | | | |
| | | | | | | |
[15.1] Silo Entrance I.
Standard Route
Fast forward Codec Call
Equip your Mk22 and follow the alternating path to the top with two rolls
Shoot the containers while heading to the west, past the now distracted guard
Roll over the rails to reach the bottom, then roll up the building’s ramp onto the cracked concrete
From here, roll diagonally (northeast) onto the crates
Perform another roll to get onto the northern concrete ramp
Ascend to the building's top with another roll and head across the guarded bridge
Bump into the alerted FOX soldier, pick up your items and jump off of the bridge towards the north
Roll close to the AP to progress further
Skip Cutscene
Alternative Routes
| Roll Rush (<1s timesave) | Ladder Rush (<1s timeloss) | Sneaky Route (2+s timeloss) | | | | |
| Marginally faster alternative if you're willing to tank more damage | Slightly slower alternative if you're willing to tank more damage | Undetected - used for Tsuchinoko runs | | | | |
| | | | | | | |
[15.2] Null Boss Fight I.
Standard Route
Equip your AK-47 and go into the prone position to face Null
Zoom in, aim at Null's feet and start firing
After landing a hit, wait for the i-frames to wear off and fire once again
Repeat the last step until his Life Gauge is fully drained (Easy: 5 shots, Normal: 10 shots)
Skip Cutscene
| Action | Input |
| Fast forward Dialogue | |
| Select Silo Entrance | |
| Fast forward Dialogue | |
| Select Team & start Mission | |
M63/AK-47/M16A1 vs. RPG-7 Comparison
[16] Silo Entrance II.
Standard Route
Fast forward Codec Call
Ascend the alternating ramps with two rolls and reach the railing's end to the right
Swing yourself over the railing and drop to the pipe below
Move left and drop onto the crates leading into the tunnel
Follow the path and perform a 180-BG on the officer to interrogate him (don't let go!)
Fast forward Codec Call
Skip Cutscene
| Action | Input |
| Fast forward Dialogue | |
| Select Rail Bridge | ↑ ↑ ↑ ↑ ↑ ↑ |
| Fast forward Dialogue | |
| Select Team & start Mission | |
Alternative Routes
| Risky “Oof” Strats v2 (1+s timesave) | | | |
| RKD on guard while dropping below - “Oof” when failed | | | |
| | | | |
[17] Rail Bridge III.
Standard Route
RECOMMENDED: While loading into the level, point the Movement Stick up-left to start running in the correct direction
Run straight into the western building and pass through the room to your right
RKD past the officer and into the Secret Doc
Skip Codec Call
Skip Cutscene
| Action | Input |
| Fast forward Dialogue | |
| Select Guest House | |
| Fast forward Dialogue | |
| Select Team & start Mission | |
History of the "Spy Report Skip"
Here, we are performing a sequence break - accidentally discovered by miniomegaking. While watching one of mini's Rail Bridge route videos, MarlonH8 noticed that the guard patterns were different. Originally assumed to be either regional differences, the oddity was shortly thereafter explained by the fact that mini forgot to place spies in the area to notify him of the report and therefore skipped one step ahead.
Immediately afterwards, we tried to find similar spy report skips, but didn't have much luck. MarlonH8 did find another one for the Town Diversionary Op., which unfortunately is the slowest of the “TNT-missions” and therefore not part of the run.
[18] Guest House
Standard Route
Fast forward Codec Call
Go down and follow along the alleyway to your northwest
Turn left and stick to the building's wall until you reach the metal door
Enter the door and follow the path downwards
Roll into the AP around the right corner
Skip Cutscene
| Action | Input |
| Fast forward Dialogue | |
| Swap Jonathan with Snake | Square ← Square |
| Recruit + Python → Spy Unit - Silo Entrance | @All ↓ ↓ Square → → ↑ Square Square ← ← ↑ ↑ Square |
| Select Plant | |
| Fast forward Dialogue | |
| Start Mission | |
Healthy Snake
Snake will be fully healed after being rescued.
[19.1] Plant
Standard Route
Alternative Routes
| Diversionary Shot Route (<1s timeloss) | | | | |
| Tsuchinoko's top tier strategy | | | | |
| | | | | |
Standard Route
Equip your RPG-7, and launch some well-aimed missiles on the shadow between RAXAs four legs for maximum splash damage
Repeat until RAXA's legs are completely broken (Easy: 2 hits, Normal: 4 hits)
After the transformation cutscene, RAXA will be in Phase 2
Here, aim your shots precisely at the outside corners of the central, diamond-shaped missile bay on each arm
Repeat until each arm is destroyed to end the fight (Easy: 1 hit each, Normal: 2 hits each)
Skip Cutscene
| Action | Input |
| Confirm & fast forward Dialogue | |
| Wait for Silo Entrance Report | |
| Read it & fast forward Dialogue | |
| Recruit + Python → Spy Unit - Ravine | → ↑ L Square ↓ Square Square ↑ Square |
| Wait for Ravine Report | |
| Read it & fast forward Dialogue | |
| Recruit + Python → Technical Unit | ← ↓ Square → → → Square ↓ Square ← ← ← ↑ ↑ Square |
| Select Ravine | ↓ |
| Fast forward Dialogue | |
| Start Mission | |
There is an RPG-7 with 10 loaded rockets found towards the northeast and an additional box of Ammo (HEAT) x20 found in the southern end of the hall.
TX-55 Strats
Jonathan's Inventory
Jonathan’s items do NOT get lost after his sacrifice. You will be able to reequip them if so desired.
Alternative Routes
| No RPG-7 Start (9+s timeloss) | | | | |
| Picking up the RPG-7/ammo during the fight | | | | |
| | | | | |
[III] Lights Out and Away We Go
[20] Ravine
Standard Route
Fast forward Codec Call
Head south and roll over the rail before it bends to the right
Once recovered, pass through the tunnel in the south
To safely get past the boulder here, make sure to roll against it as opposed to alongside of it, over the crevice
If executed correctly, you can pull yourself back up and head further south to roll into the AP
Fast forward Codec Call
| Action | Input |
| Fast forward Dialogue | |
| Select Power Substation | |
| Fast forward Dialogue | |
| Start Mission | |
No Fall Damage
At the cost of a few seconds, the fall damage of the Standard Route can be mitigated by rolling over the railing earlier.
Alternative Routes
| Slow Descent Route (<1s timeloss) |
| An alternative path leading to similar results |
| |
[21] Power Substation I.
Standard Route
Fast forward Codec Call
Head east and ascend the ramp with three rolls
Go north and roll off of this level towards the ladder
Climb the ladder to the very top and head further north
RECOMMENDED: Drop your RPG-7 and pick up the Medical Kit S
Roll onto the main building and head to the northwestern opening
Roll off the edge and enter the building through the sliding door
Run eastwards past another door and onto the yellow-striped hallway
Take two lefts and pass the door to get into the AP inside, on your left
Fast forward Codec Call
| Action | Input |
| Fast forward Dialogue | |
| Wait for Detonation Timer development to “begin” | |
| Confirm it & fast forward Dialogue | |
| Equipment (Snake): Equip Time Bomb onto Mk22 | [Time Bomb] [AK-47] [RPG-7/Med Kit S] [Stun G] |
| Python → Sneaking Unit - Team Alpha #2 | ↓ Square ← ↑ ↑ Square |
| Select Power Substation | |
| Fast forward Dialogue | |
| Start Mission | |
Why unequip the Mk22 and menu in Python?
Unlike on other routes, we don't have the need to make it through the Silo Entrance and Complex silently. With no use for Mk22 shots to distract guards, better routes are now available.
By putting Python into Team Alpha's Slot #2, we skip any further Unit Management later on and save a good second this way.
Python is chosen over the Recruit, because only he has a fixed CQC Rank of B, which is necessary to perform grabs on enemies. Additionally, him having a faster stalk shaves off bonus frames.
[22.1] Power Substation II.
Standard Route
Fast forward Codec Call
Once again, run eastwards and ascend the ramp with three rolls
Head north and roll off of this level towards the ladder
Climb the ladder to the very top and head further north, then roll across the gap
Continue north and enter the building with the sliding door around the corner
Descend the nearby staircase and exit through the door
Take another left and head inside the room with the AP once again
Equip and plant the Time Bomb next to the panel
Fast forward Codec Call
Skip Cutscene
Alternative Routes
| Drop Route (<1s timeloss) | | |
| Just another alternative path | | |
| | | |
[22.2] Null Boss Fight II.
Standard Route
Same as before, equip your AK-47 and go into the prone position to face Null
Zoom in, aim at Null's feet and start firing
After landing a hit, wait for the i-frames to wear off and fire once again
Repeat the last step until his Life Gauge is fully drained (Easy: 6 shots, Normal: 10 shots)
Skip Cutscene
| Action | Input |
| Fast forward Dialogue | |
[NORMAL] Wait until Daytime if necessary (Stun G only spawns at Day) | |
| Select Silo Entrance | |
| Fast forward Dialogue | |
| Start Mission | |
[23] Silo Entrance III.
Standard Route
Fast forward Codec Call
As usual with Snake, ascend the alternating path with two rolls and head west
Roll over the rails to reach the bottom, then roll up the building’s ramp onto the cracked concrete
Roll diagonally onto the crates northeast of you, then perform another roll to get onto the northern concrete ramp
Ascend to the building's top with another roll and head across the bridge to pick up your Stun G set
Return and roll over the bridge's railing to the north, then head east to roll into the AP area at the end of the tunnel
| Action | Input |
| Fast forward Dialogue | |
| Select Silo Complex | |
| Fast forward Dialogue | |
| Start Mission | |
Possible Ladder Route
While a strategy similar to SE1's alternative “Ladder Rush” is doable, you'd be putting yourself at a big disadvantage by going on such a route.
Some guards in the area are also equipped with shotguns, which can easily cost you seconds when getting hit and knocked down.
Alternative Routes
[EASY] Straight2Complex Route (12+s timeloss throughout the run*) | | |
| Skip Stun G pickups - *16+s timesave on EASY | | |
| | | |
[24] Silo Complex
Standard Route
Fast forward Codec Call
Call Ghost from your Codec, fast forward, then tune to and call 145.75 to unlock the first door en route through the stage
Fast forward, call 147.42, fast forward again and finally tune to and call 148.51 to unlock two more doors
Exit the Codec, pause the game and perform a Member Change
| PAL/Guard Route | NTSC/Key Route |
| Head forward and right, then stalk up to the FOX soldier behind the crates | Head forward past the pillar and crates, then continue right and take a left |
| Grab, then drag him to the door you just passed to gain temporary access | Escape through the door to the hall and cross the southern and eastern gaps with rolls |
| Push-drop him and run inside to bump into the guard between the walls on the left | Pick up Key E, then exit the way you came from and head to the door north of you |
| Quickly advance through the door next to him | Avoid the soldier's shotgun fire and rush through the door behind him |
Continue through the formerly frequency-locked door and ascend the staircase behind the left door with two rolls
Enter the room behind the right door and continue southeast to pass through the second, now unlocked door
Rush past the bridge into the next building and head left to follow along the corridor
Ignore the door guarded by gun cameras above and continue further westwards
Bump into the soldier around the corner and rush past the third ID-locked door to avoid any retaliatory fire
Run up the first and roll up the following ramp, then cross the bridge into the control room
Pick up Key E below the gun camera, then exit the room and roll over the northern railing
OPTIONAL: Roll southwards instead, follow along the path and pick up 2 + 1 Medical Kit S x 3 upon your return
Enter the next room and roll onto the AP located in the southwestern corner of the lowest level
Fast forward Codec Call
| Action | Input |
| Fast forward Dialogue | |
| Select Silo Complex | |
| Fast forward Dialogue | |
| Start Mission | |
PAL vs. NTSC
Arguably the biggest version difference of the run is right here. On NTSC versions you can not drag any soldier in front of the 1F door to open it.
Ghost Codec
Opening your contact list and calling Ghost saves time compared to manually tuning to 145.75 from 140.85. Ghost's frequency (144.78) lets you skip closer to 145.75.
Door Frequencies
145.75 is used on all routes to get you through the locked 1F door in the room behind the “wall guard”.
147.42 is used on most routes to get past the 2F door leading onto the bridge without having to drag a guard all the way over there.
148.51 is used on routes triggering an Alert Phase, as it lets you rush past the final soldier instead of having to deal with him.
Alternative Routes
Disclaimer: While most of the videos below show Snake being used for the majority of the route, all strategies work identically when swapping in Python for Snake instead!
| 3-Codec Route + Heals (8+s timeloss) | [NORMAL-only] 2-Codec/“ + Heals (<1s timesave/8+s timeloss) | NTSC Key Route/” + Heals (7+s/15+s timeloss) | | | |
| Additional heals for those who want to play it safe | Uses the guard present on NORMAL instead of calling 147.42 | NTSC's fastest option | | | |
| | | | | | |
[25] Cunningham Boss Fight
Standard Route
Fast forward Codec Call
Skip Cutscene
Equip a Stun G, wait for Cunningham to move left or right and throw it close to him on your platform's edge
Repeat these throws a few times to make short work of this fight (Easy: 5 hits, Normal: 6 hits)
Skip Cutscene
| Action | Input |
| Fast forward Dialogue | |
| Select Launch Control Room | |
| Fast forward Dialogue | |
| Start Mission | |
A box of ammo drops at the very beginning of the fight. The type of ammo is based on whichever weapon you have equipped before it falls to the ground.
This can come in handy if you are running low on AK-47 ammo (7.62x39mm) for the upcoming fight against Gene.
Cunningham's Rare Bait
There is an extremely slim chance of Cunningham reverting to his original position after his first move to the left or right.
If you're playing on EASY and this causes you to run out of Stun Grenades, the best recovery is to quickly restart the fight from the Pause Menu.
Reload Animation Cancels/Quick Reloads
Increased Accuracy + Trivia
As with most weapons, firing while crouched significantly increases the player's accuracy. This is especially useful for the classic M63 strategies here.
On August 5 2018, three hours before a #MGSR MPO race stream between Pythonicus and MarlonH8, the latter “rediscovered” this detail, which lead to both runners defeating Cunningham a whopping minute earlier than what was expected at the time.
Outdated Legacy Routes
Alternative Routes
| M63 Lethal (7+s timeloss throughout the run*) | 5 x Stun G + 3 x RPG-7 + 7 x MK22 (17+s timeloss throughout the run*) | | |
| *If you get insanely lucky accuracy, you can skip a phase and save 7+s total | *When on 1 Stun G Route, the total timeloss is minimized to 3+s | | |
| | | | |
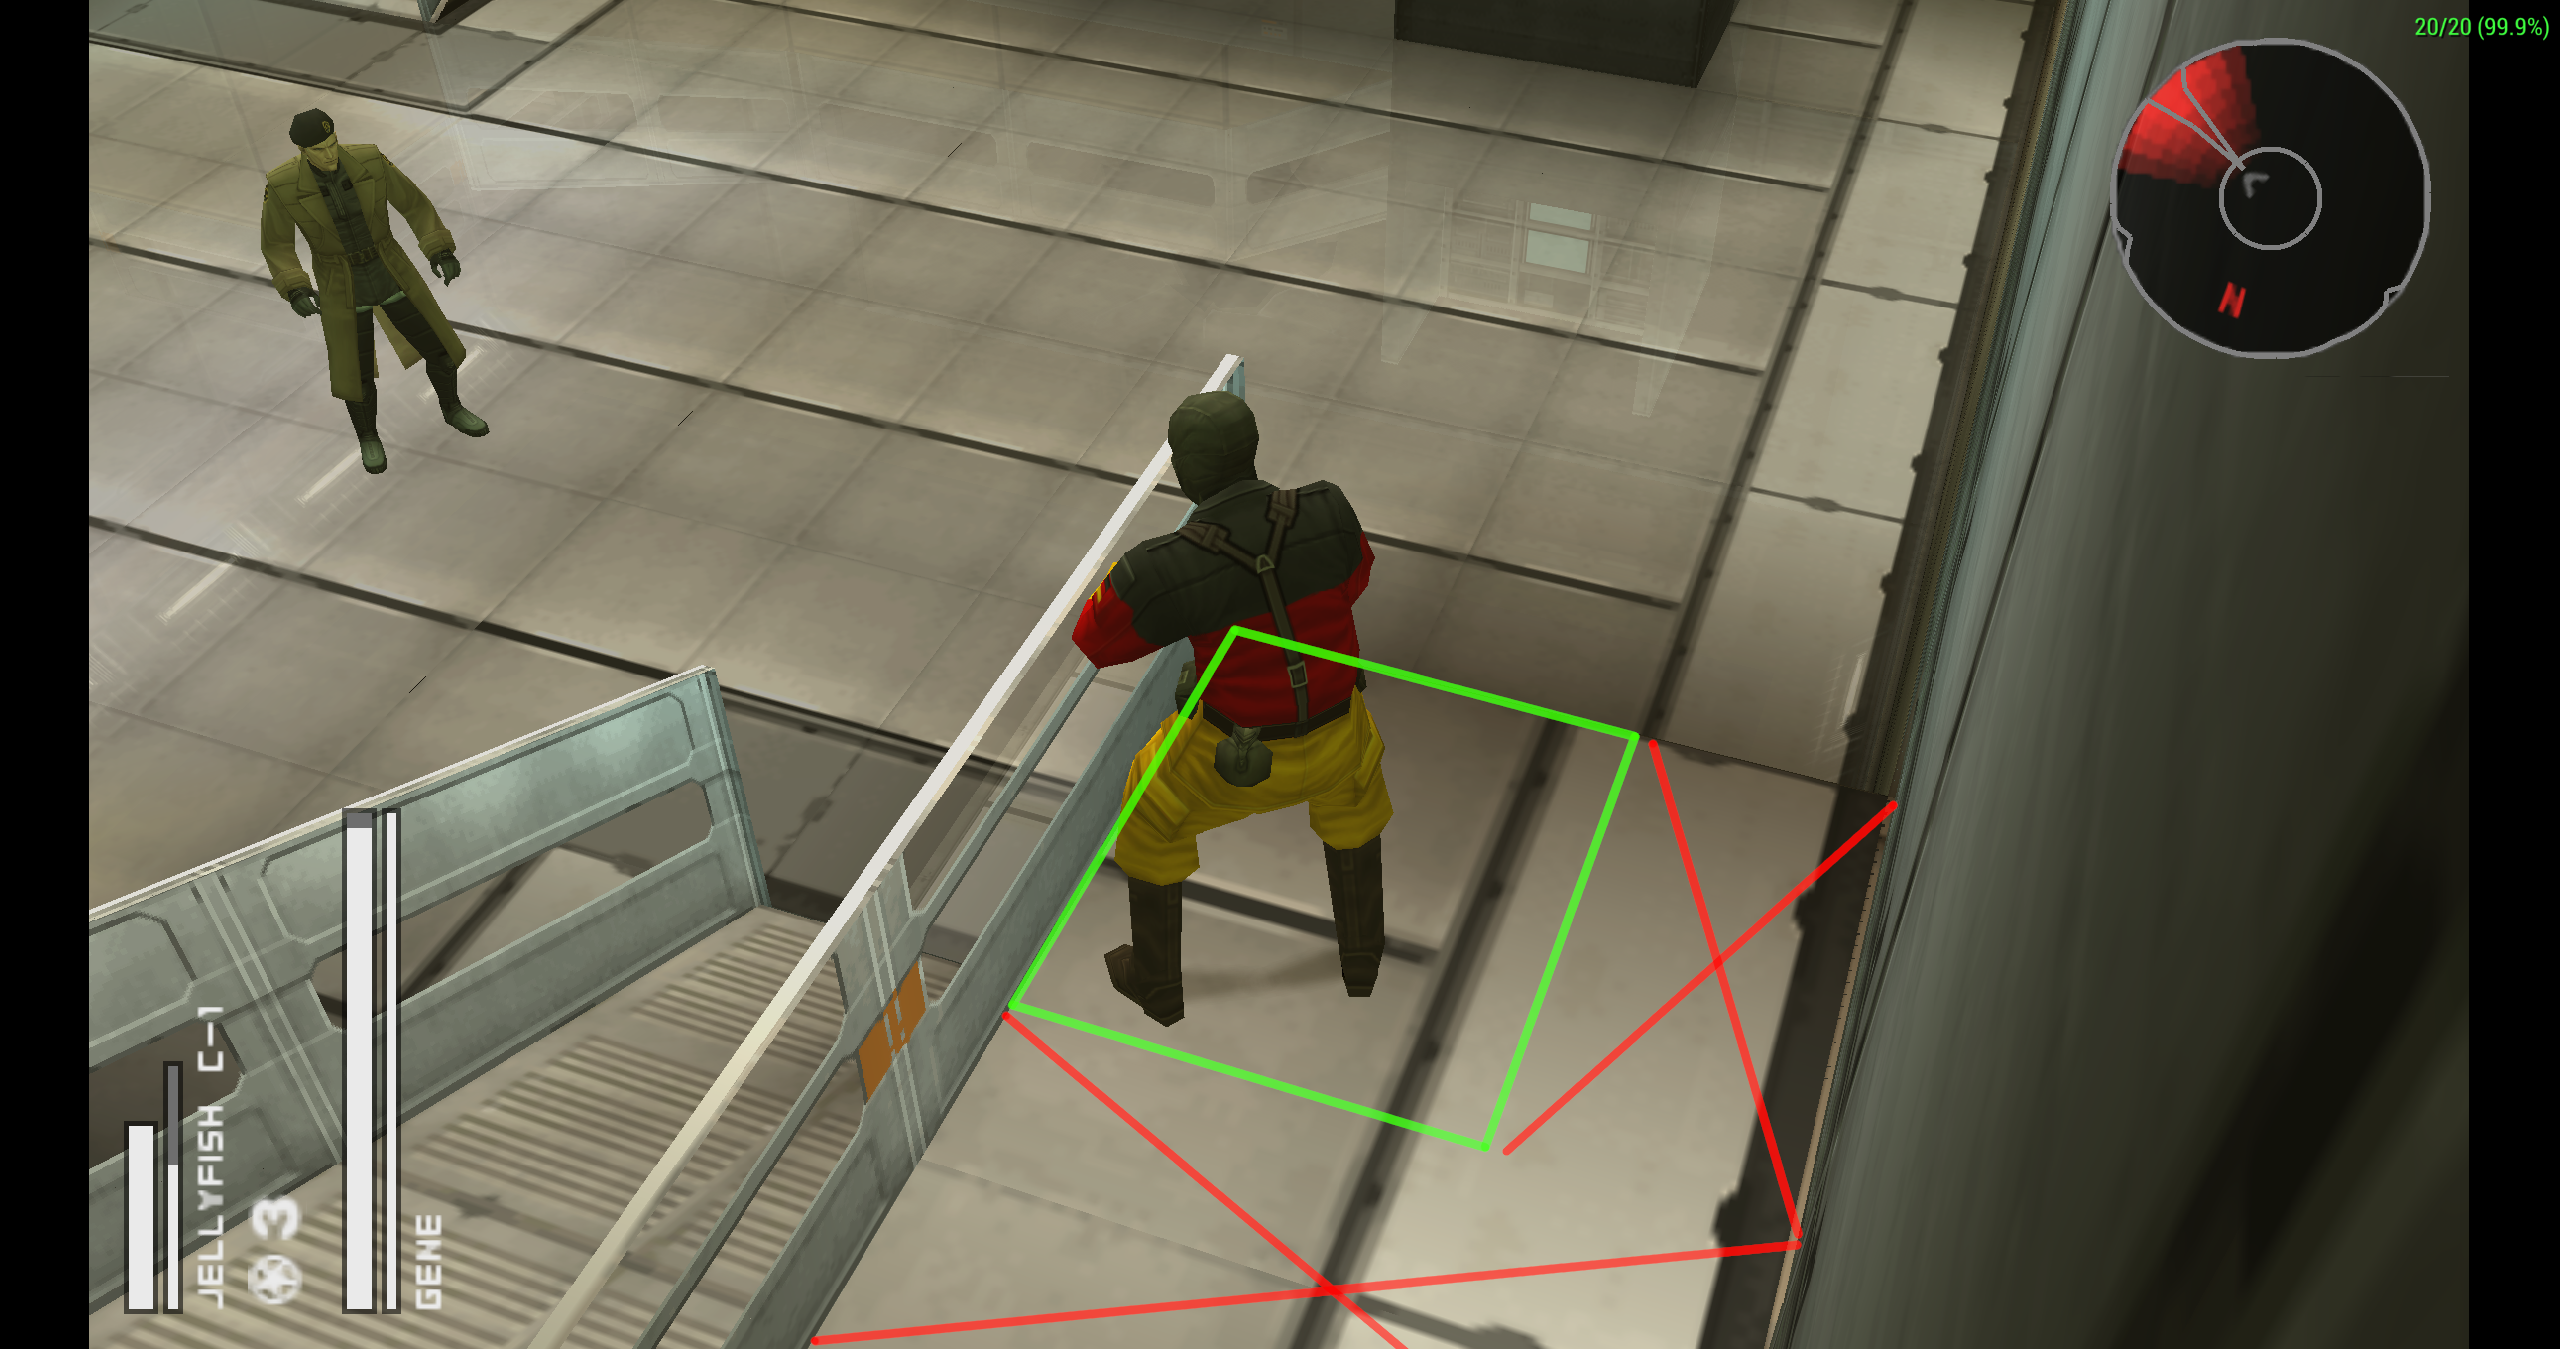
[26] Gene Boss Fight
Standard Route
Skip Cutscene
Skip Cutscene
Head up the northern ramp and back around the railing to the left to position yourself in front of the drop
Equip your AK-47 and try to land a hit at the very top of his head to immediately stop his Psychic Phase
Continue landing hits on his beret whenever Gene is not recovering from i-frames
Gene will continually increase the pace at which he will be doing most actions over the course of the battle
Keep sending hatshots his way until he is defeated (Easy: 7 headshots, Normal: 10 headshots)
Skip Cutscene
Watch Credits
Check Result
Should you find yourself running low on ammo, an additional ammo pickup will spawn in the northwestern corner of the room.
Emulator Crash Trivia
Alternative Routes
| Classic Gene (23+s timeloss) | Classic Non-Lethal Gene (43+s timeloss throughout the run) | |
| No cheese - the go-to lethal strat pre-September '22 | No cheese - Mosin N + Mk22 - equip Mosin N onto Stun G post-PS1 | |
| | | |
RUN COMPLETED!