Table of Contents
Metal Gear 2 100% (PS2/HDC) Tutorial
Collect All Weapons And Items. Call all 8 codec frequencies at least once. Must Show Inventory Before Metal Gear Fight to show you have all items and Weapons.
This page is a work in progress and primarily based on the PS2/HDC any% route on easy difficulty with fitted adjustments to meet the 100% requirement.
Meet Black Ninja
Infiltration Point
Video Tutorial
https://www.youtube.com/watch?v=6GylJn5DyFU&list=PLp02-dI93qVSciifmhO0gMUSXRXU__Sma&index=2
click for full resolution image

Timing is everything on the first map
- Turn left and immediately up after the codec is over to make your way to the top right corner of the fence
- On your way, inside the truck to the right there's your first Ration B1
- It is recommend to grab it in the beginning, but can be skipped
- timing might be tight with the fence guard for new runners
- We'll explain how to acquire another B1 ration at the end of the route
- Once the top right corner has been reached, go under the fence and walk left as soon as possible
- punch the guard before he sees you
- Continue on to the left side of the map
- Distract the incoming guard with a wall punch
- head further inside the fences back to the center
- From there follow the path north and turn right at the trucks
- The most right truck contains the pistol
- Grab it and get out, crawl under the center truck to not get spotted
- Enter the vent and continue onwards inside Zansibar's first main building.
Key aspects:
- Try not to get an alert - the Black Ninja manipulation requires 0 alerts and 2 “What was that noise”
- be fast in the beginning
- Meeting the guard cycles is daunting at first
but once getting used to it
every guard should be automatically out of your way
or easy to avoid with a punch - grab pistol
- get inside the vent
Zanzibar Bldg. 1F
Video tutorial:
https://www.youtube.com/watch?v=-uYsm1NKbRE&list=PLp02-dI93qVSciifmhO0gMUSXRXU__Sma&index=3
click for full resolution image

- Key is to get inside the elevator without getting an alert
- Stand up and walk the path to the right until you get to the main ground
- Go left and up, walking to the center
- reach the next higher ground that leads to the elevator
- Make sure to punch all guards on your way
- Do not enter the screen with the elevator access too early or you will run into the incoming guard
- Check the radar to make sure the guard is at his most top cycle and turning right
- that way you can not touch the guard accidentally and avoid getting an alert
- Take the elevator up to 2F.
Key points:
- punch all guards on your way to avoid being seen
- avoid the alert from the elevator guard by checking the radar
- crawl into elevators to not waste time (crawling allows for quicker control over snake)
Zanzibar Bldg. 2F
Video Tutorial:
https://www.youtube.com/watch?v=-uYsm1NKbRE&t=62s
click for full resolution image

- punch the elevator and head east
- Follow the path and just head into the right housing to get the level 1 door card
- then follow up north to the room to get the binoculars
- Exit back to the elevator
- You will automatically be heard by the guard getting your 2nd “What was that noise” for the Black Ninja manipulation
- Enter the elevator by crawling into it and take it up to 3F.
Black Ninja (Black Color)
Video Tutorial:
https://www.youtube.com/watch?v=-uYsm1NKbRE&t=82s
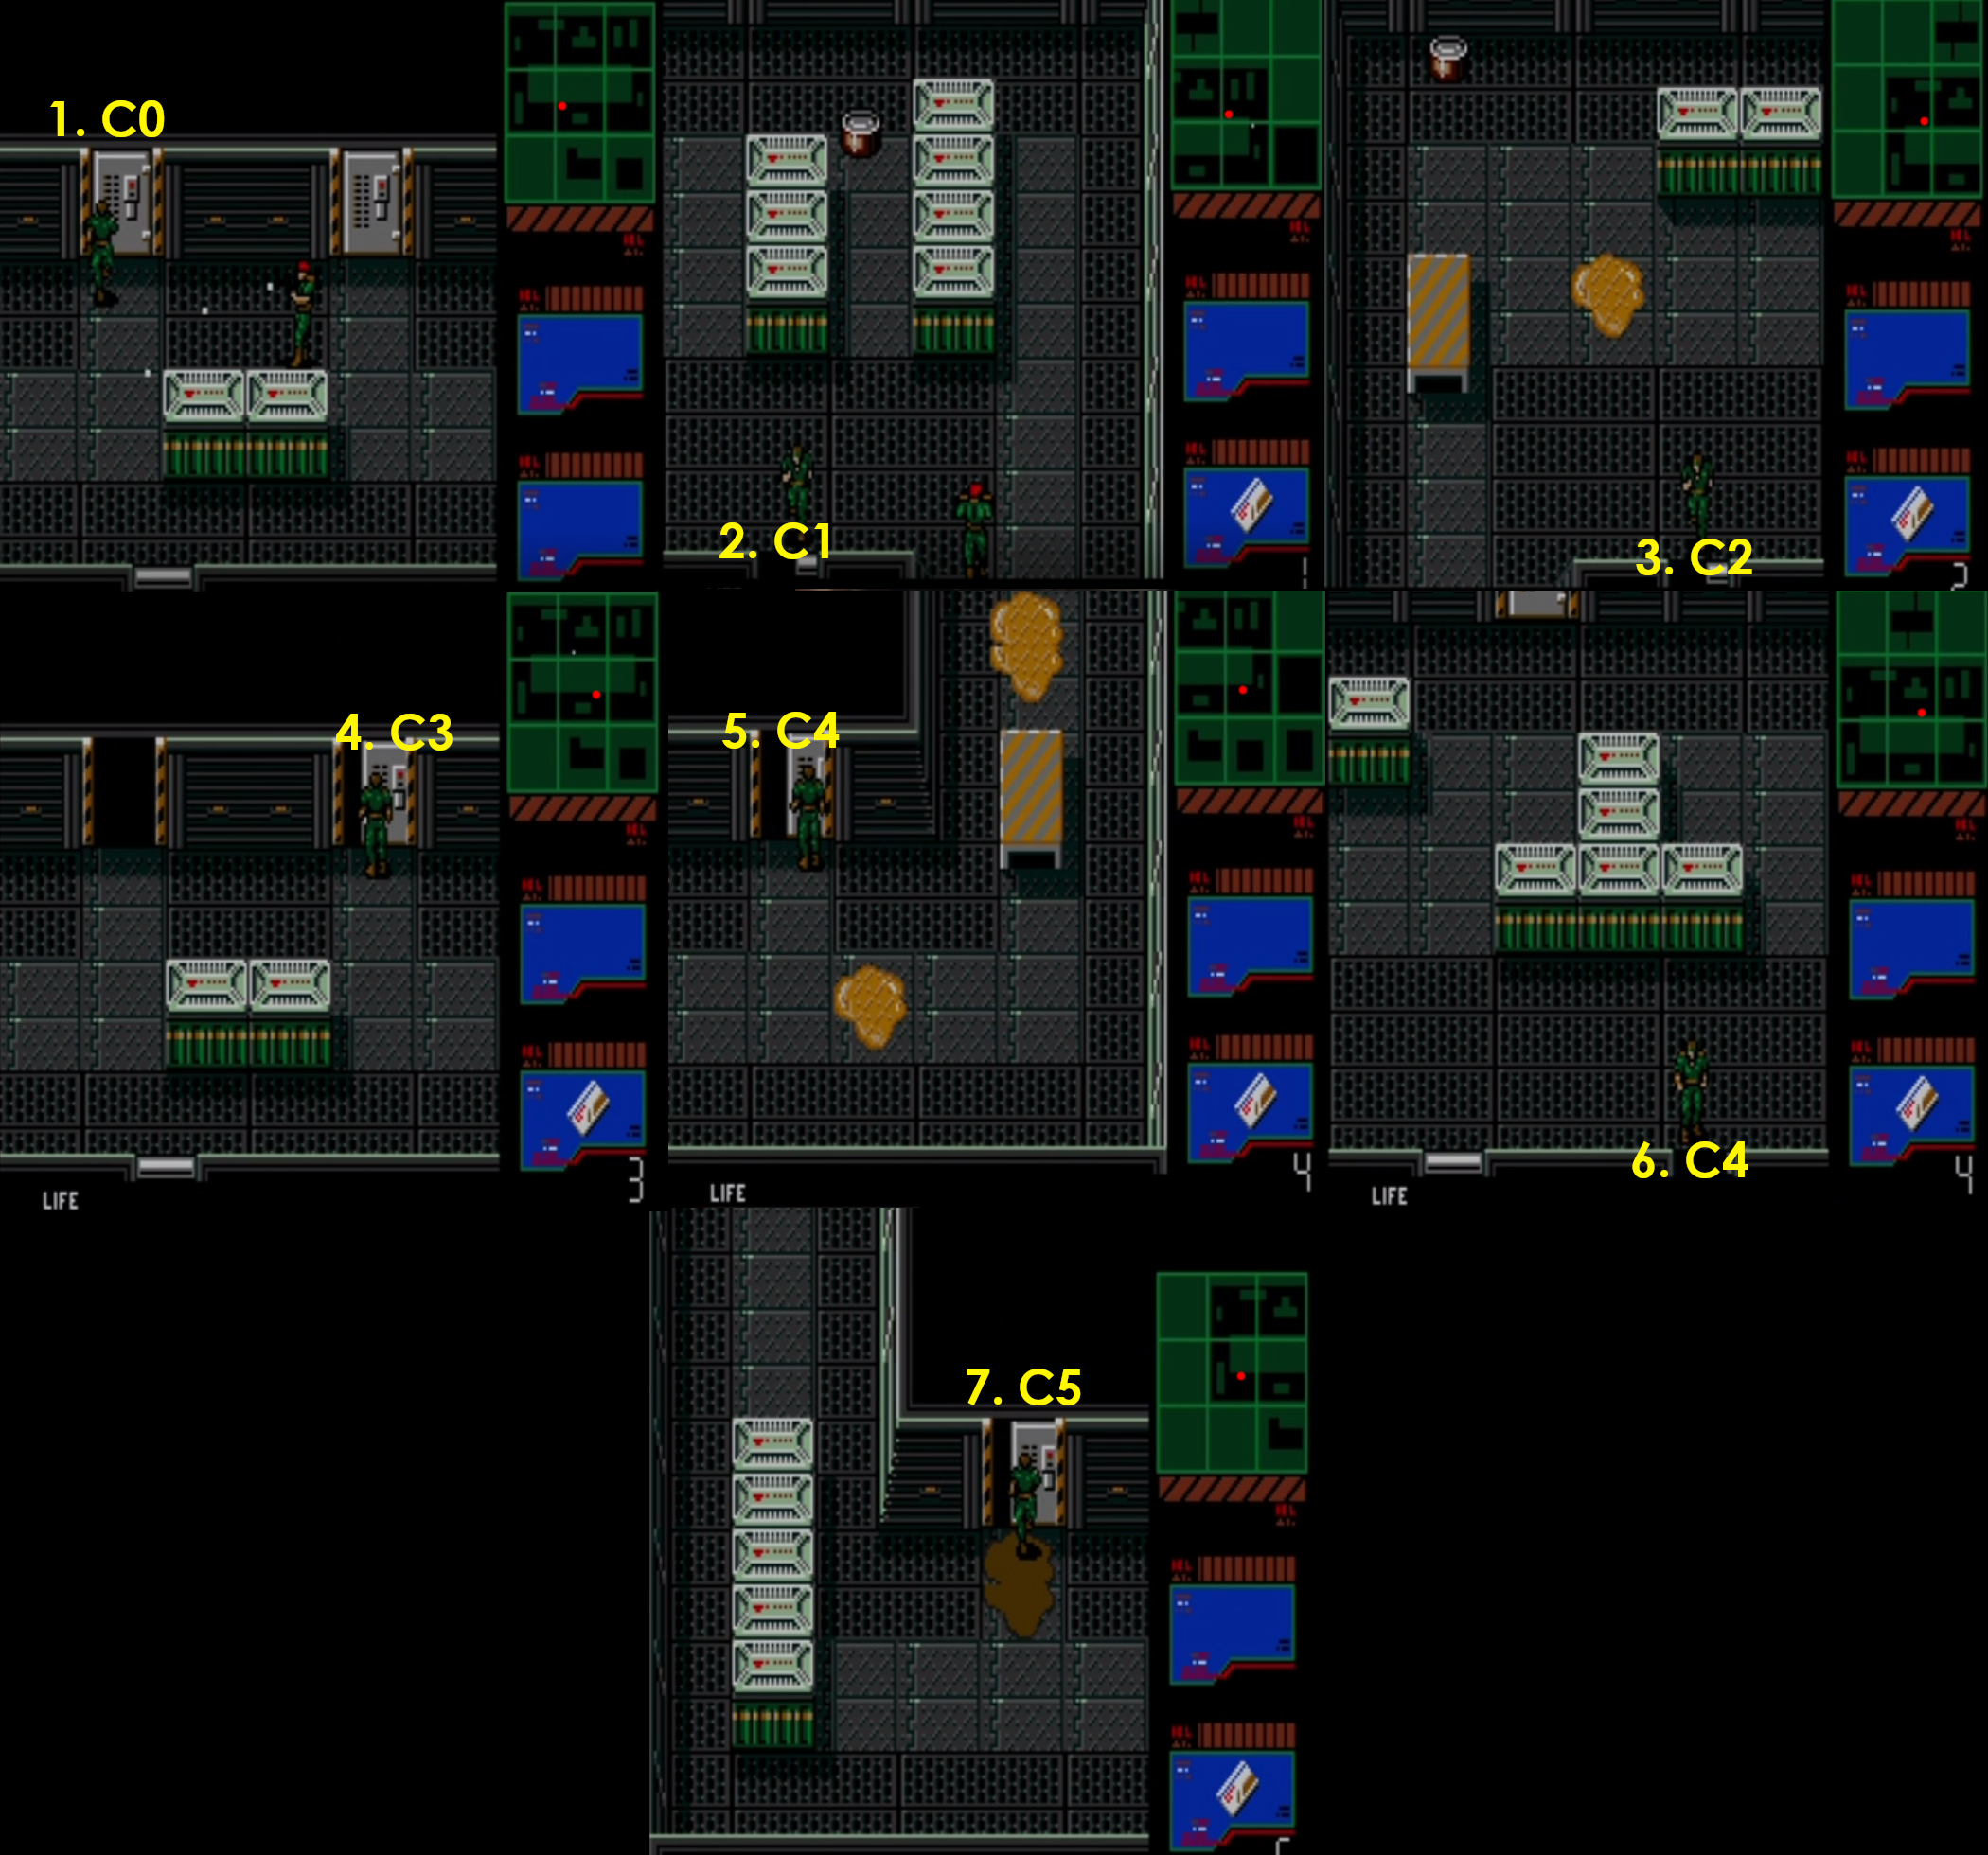
Click for full resolution map

- On PS2 from a fresh load from the Subsistence menu, you can manipulate Black Ninja
- You must get to Black Ninja without any alerts and two “What's that noise?”
- Black Ninja takes 6 bullets to kill
PS2 Positions
PS3 Positions
You can't manipulate Black Ninja on PS3.
Xbox HDC Positions
Post Black Ninja
Red Line: Go north and enter the right room to get the gas mask.
Blue Line: Then exit and head north east to get the mine detector.
Green Line: Leave back to the center elevator room via the western door.
Click for full resolution map

Green Beret Guard Tracking
Video Tutorial:
https://www.youtube.com/watch?v=9SudoC2qzUY&list=PLp02-dI93qVSciifmhO0gMUSXRXU__Sma&index=5
Zanzibar Bldg. 1F
Video Tutorial:
https://www.youtube.com/watch?v=9SudoC2qzUY&list=PLp02-dI93qVSciifmhO0gMUSXRXU__Sma&index=5
click for full resolution image

- Get out of the elevator and make sure to stick to the lower wall when leaving the elevator access screen
- the goal is to not run into the incoming guard
- Turn south and punch the wall to distract the guard that is about to leave the screen
- It'll keep the guard on that screen so you can punch the guard later to avoid an alert
- Move on and wait at the steps for the next incoming guard
- Punch and follow to the east corner again
- This time punch the guard that we just distracted
- follow the path north to get to the north west door
- That door leads to the jungle entrance and the green beret guard we need to follow
- Be aware that the guard right at the exit door can be standing in your way!
- enter the screen carefully, punch the guard and then continue.
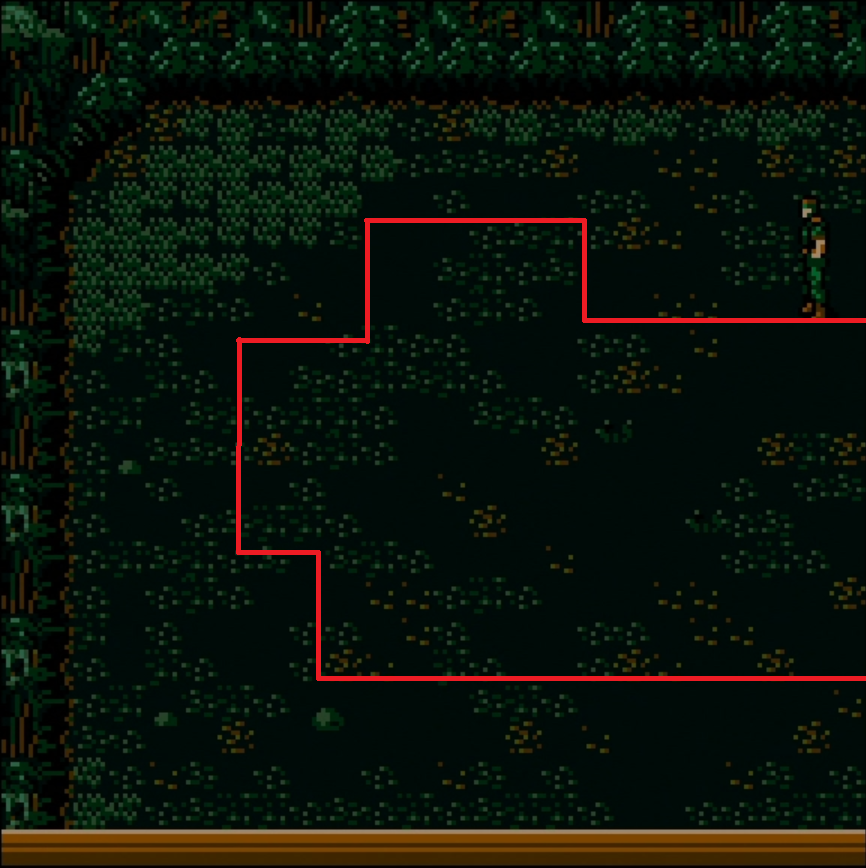
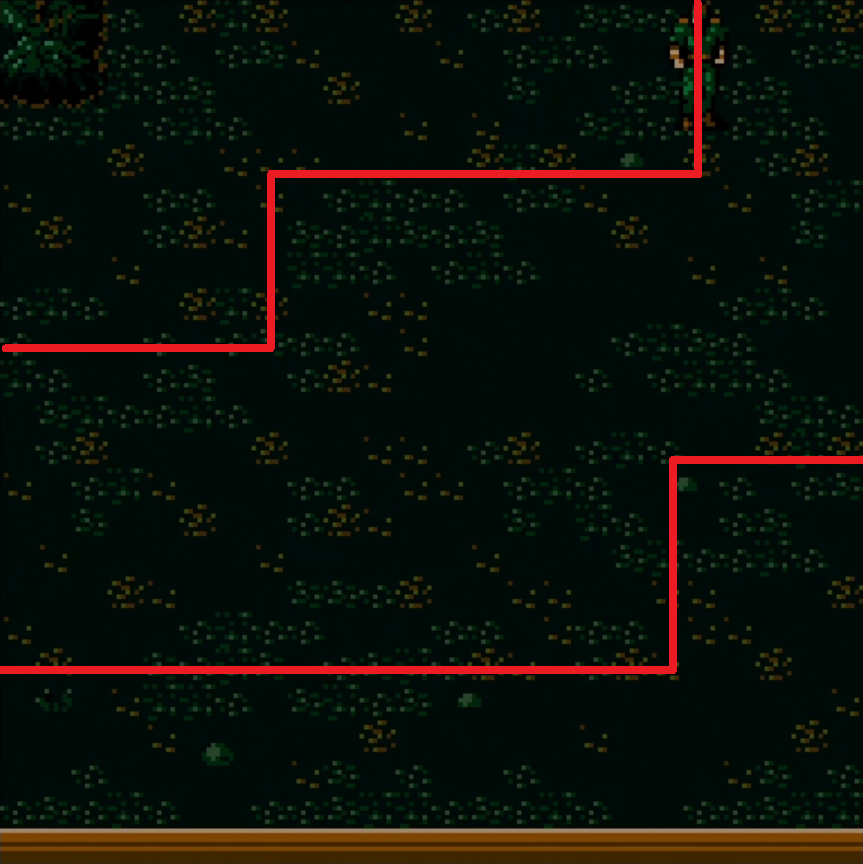
Lost Woods
Video Tutorial:
https://youtu.be/kF1wGcyxHqU?t=110
Key Points:
- follow the green beret close but don't run into him
- do not take too long to follow to the next screen
or the guard will despawn and you have to restart tracking him down - call codec 140.82 after you found the hut to call Dr. Madnar
Meet Running Man
Video Tutorial:
https://www.youtube.com/watch?v=0RGpHbPgopc&list=PLp02-dI93qVSciifmhO0gMUSXRXU__Sma&index=5
Lost Woods
Follow the video to get to the desert map.

After you called Dr. Madnar - go straight to the swampland and drown.
The game's checkpoint system has made a checkpoint the moment you called Dr. Madnar.
On NTSC/HDC it can save up to 10s (a bit less on PAL) in IGT.
You will spawn back at the door of the building - but have correctly
called Dr. Madnar already. After this, you can continue as normal.
Desert South
Click for full resolution image

Video Tutorial:
https://youtu.be/0RGpHbPgopc?t=37
- Enter the screen and start crawling right to get your first mine.
- Menu to the mines and grab at least 3 more mines.
- It is recommended to grab a 5th since we need 1 extra mine to finish the game at the end.
- It will make your menus also cleaner to navigate having 1 extra mine after the Running Man fight.
- But for Running Man only 4 mines are necessary.
Swamp Line
Follow the video to get through the Swamp
Video tutorial from the playlist: https://youtu.be/0RGpHbPgopc?t=98
 | ||
 |  |  |
Running Man
Video tutorial: https://youtu.be/0RGpHbPgopc?t=303
- Running Man takes 4 mines to kill on easy
Meet Hind-D
Video Tutorial:
https://www.youtube.com/watch?v=BNvnG63ESXs&list=PLp02-dI93qVSciifmhO0gMUSXRXU__Sma&index=6
Swampland 2
Just like above, but in reverse.
After that, follow the map for the fastest way to return back to the Zanzibar Building.

Stinger Missile
Click for full resolution image
Map

Key Points:
- walk in close lines to the door
- turn right
- go under the cover
- on going down, shoot once
- it'll distract the guards
- run to the stinger, grab them return
- on your way up
EITHER:
- Follow the blue line up
- if the left guard didn't turn right, shoot the guard on your way up
- run into the camera and get a “no-freeze” alert
- leave to the top and follow the line back into the lost woods
- (the following guard won't see you with this alert)
OR:
- follow the red line back to top again
- punch the guard to bypass on going right for a non-lethal approach
- get back outside and leave the screen directly
Lost Woods to Desert
click for full resolution image

Follow the top line to get back to the singing sands faster
Singing Sands (Desert)
click for full resolution image

Either follow the red line to avoid damage and pick up the mines
(knowing it will lose you time, or run straight through all mines.
Your health should ideally be good enough that you can tank damage
and finish Hind-D without further damage.
- follow the blue line for a direct path
- follow the red line to avoid early mine damage
- at the first barrel section, either pick up the mines or walk over them
- the damage you take on easy difficulty is negligible
- walk up and bypass the first guard screen
- on the 2nd screen with guards either storm up and take the alert
- or enter from the left and punch the first guard to avoid an alert
- keep following up and stay to the right side of the screen
- the goal is to enter the Hind-D screen as right as possible
Hind D
*Hind D takes 4 missiles to destroy
Video Tutorial
Meet Holly
Video Tutorial:
https://www.youtube.com/watch?v=J7vrHi-rWvQ&list=PLp02-dI93qVSciifmhO0gMUSXRXU__Sma&index=7
Tower Bldg. Front
click for full resolution image

Lethal Method of Entry
- go up until you meet the barrels
- stick close to the barrels and enter the right screen
- instantly shoot on entering the screen
- enter the left truck to acquire the cardboard box
- exit the truck and head right to the conveyor belt
- shoot the most right guard
- take the call from the colonel, after the call the belt starts running
- equip the cardboard box and step on the conveyor belt
Non Lethal Method of entry
- go up until you meet the barrels
- stick close to the barrels and enter the right screen
- wait for the closest left guard to look right
- punch that guard
- then punch the truck to get the other guards attention
- punch the lower guard
- enter the left truck to acquire the cardboard box
- exit the truck and head right to the conveyor belt
- take the call from the colonel, after the call the belt starts running
- equip the cardboard box and step on the conveyor belt
Alternative Non-Lethal, No Alert method:
https://clips.twitch.tv/BitterAbrasiveHerdCharlieBitMe-1aJGzl9yGMEXtQju
Tower Bldg. 1F (Spiral)
click image for full resolution map

- once inside the building, unequip the cardboard box and go to the level 3 door card
- follow the guard north and ideally punch the guard on the next screen
- crouch into the vent shaft and get the Ration B2
- take the codec call from Holly
- then leave towards the elevator down the spiral
- punch 3 guards on your way marked on the map
- then take the elevator down to the B2 level
Tower Bldg. B2 (Sewers)
click the image for full resolution map

- step out the elevator and follow the path down left
- enter the left door to grab one pack of plastic explosives
- continue out and turn left
- turn up and enter the top right room
- equip the level 1 card and the plastic explosives
- once in the room, turn up slightly and then right
- explode the wall
- enter and chat with holly - she will give you the level 4 door card
- exit back out again to the sewers
- follow the path to the bottom left ladder
- menu to the level 4 card and the pistol
- take a swim to the bottom elevator
- stay in the dark water as long as possible to be as fast as possible
- once turning right, hold right or stay immediately on holding up
- as you hold up, even when diving, you will automatically enter the small gap
- follow the path to reach the elevator
- and take the elevator up to B1
Meet Red Blaster
Video Tutorial:
https://www.youtube.com/watch?v=J7vrHi-rWvQ&list=PLp02-dI93qVSciifmhO0gMUSXRXU__Sma&index=7
Zanzibar Bldg. B1
click image for full resolution

welcome to the armory, get some grenades and more!
- Red Line: Start by heading right and go down to get the SMG
- Blue Line: leave north and get the grenades
- Green Line: After the grenades, head north and get the R.Missiles
- Orange Line: After that head north again to get the bullet vest in the most northern room.
and finally:
- Pink Line: Return back to the elevator, in the B2 basement, swim back up to the Tower Building elevator and take it up to 1F again
Tower Bldg. B1 (Sewers)
Swim back around counter clockwise to meet the Tower Building elevator. Take the elevator up to 1F.
Tower Bldg. 1F (Spiral)
Exit the elevator and turn left, follow the path to the next elevator.
Take the elevator up to the 30th floor (just punch once).
Then the Red Blaster fight will begin on exiting the elevator.
Red Blaster
- Red Blaster takes 12 grenades to kill
Video tutorial:
Tower Roof Pigeon
Video Tutorial:
https://www.youtube.com/watch?v=J7vrHi-rWvQ&t=680s
general map

- after leaving the red blaster fight room
- equip the Ration B2
- equip the plastic explosive
- after having found the pigeon call codec 140.51
- then call Dr. Madnar from your saved codec list
- leave the pigeon room
- take a continue
- hold down on respawn (your position is set to the tower door)
- menu back to the level 4 door card and menu to the mines
- L2 - Left - Up 2x - R2 - Down - R2
Addendum: Continue faster by using explosives rather than walking into the pit:
Meet Gustava
Video Tutorial:
https://www.youtube.com/watch?v=0Jg1Jgw8pSA&list=PLp02-dI93qVSciifmhO0gMUSXRXU__Sma&index=8
Tower Bldg. 1F (Spiral)
- go back out the elevator and trace your steps back to the center elevator to take it down to the B2 level
Tower Bldg. B1 (Sewers)
take another swim to the Zansibar building and take the elevators up.
Tower Bldg. 2F
click the image for a bigger view

Once you're out of the left elevator. Head left and get the silencer.
Continue back to the elevators and take the right one to go to 3F.
Tower Bldg. 3F
Click image for a bigger view

Red Line: Enter the southern room again and walk the most southern path to the right to head to the IR Goggles.
Watch out, there are guards in your way. Dispose of them with the pistol or the SMG.
Blue Line: After that return back to the elevator and head to 4F to meet Gustava.
Zanzibar Bldg. 4F
Click the image for the full resolution map

- leave the elevator and turn immediately left
- enter the door
- press down on load and punch, the goal is to get the guard as early as possible to continue quickly
- if done correctly, you should not be caught by the laser trap
- continue up and equip the level 1 door card
- wait for the camera at the top end to move up
- walk left and wait behind the box
- check the radar to see where the incoming guard from the left screen is positioned
- once the guard is close enough you can continue walking (check video tutorial for example)
- follow the path around and to the bottom
- enter the door
- in the next room, switch to the level 4 door card
- enter the dark room
- on entering the dark room turn right and go into the vent shaft
- during the crawl equip the level 3 card
- stand up and walk left until you're about at the center of your life bar
- enter the door and follow along
- equip the level 4 card after entering the 2nd mannequin room
- check the radar, that the mensa hall has no guard seeing you on entering
- follow the top part along the wall and turn south at the end
- wait at the toilets for Gustava to enter the ladies bathroom
- you can enter the men's bathroom to quickly grab the bucket on your way
- if you forget the bucket, you can always get it on your 2nd visit when freezing the brooch.
- once the door is open you can enter and start the dialog with her
If you want to practice 4F Mannequin Room,
you can enter and exit the rooms to get different RNG seeds
Ideal Spot to go up in Mannequin Room
Tower Bldg. B3 (Gustava and Dr. Madnar Escort)
Video Tutorial:
https://www.youtube.com/watch?v=tGjfz0XFyjs&list=PLp02-dI93qVSciifmhO0gMUSXRXU__Sma&index=9
Crevice South
Hang Glider and Brooch Backtrack
Video Tutorial:
https://www.youtube.com/watch?v=zQiUYatSfdw&list=PLp02-dI93qVSciifmhO0gMUSXRXU__Sma&index=9
Tower Bldg. 1F (Spiral)
follow the left path south and exit the bottom door with the level 4 door card
Singing Sands
Follow the path south. Optimize your menu by getting rid of the Ration B2 since we don't need it anymore.
Assuming you picked up the Ration B1 in the beginning
From the level 4 door card go up 2 to get to the Ration B2
Follow the path south and walk over mines until the ration gets automatically used.
Open your menu again and go left one slot to equip the level 2 door card.
If you didn't pick up the Ration B1 in the beginning
From the level 4 door card go up/down 3 to get to the Ration B2
Follow the path south and walk over mines until the ration gets automatically used.
Open your menu again and go left one slot + down one slot to equip the level 2 door card.
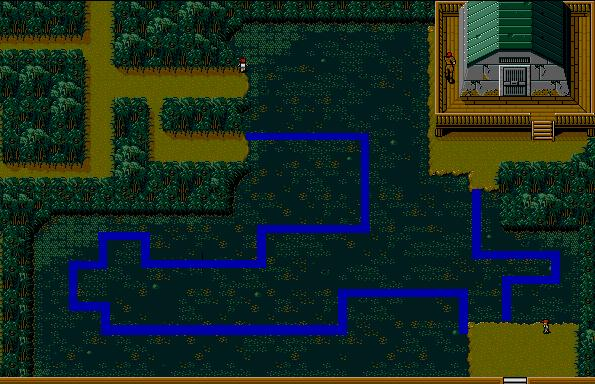
Lost Woods
click image for full resolution map
take the top path of this map to return back to the Zansibar building
Zanzibar Bldg. 1F
click for full resolution image

- on entering the main map again walk right
- enter the room with the colored cards and get the red (center) and blue (left) card to save time in menus
- at the top right screen distract the guard with a wall punch
- continue south and use the level 6 card to get access to the hang glider
- after the hang glider, access the central elevator again to go to 4F
- equip the level 4 card after having left the hang glider hall
Zanzibar Bldg. 2F
leave the elevator and enter the left elevator to head to B1.
Zanzibar Bldg. B1
Click the image for a bigger preview

Time to get the last missing items!
Red Line
Enter the room south and go left.
You will need to make your way up to get to the room with the oxygen tank.
In the same room you can also get the robot mouse.
Blue Line
After having acquired the two items, head north and get to the screen with the camo mat.
Orange Line
After the camo mat, walk south again to enter the elevator.
Proceed onwards to 4F.
Zanzibar Bldg. 4F
Click the image for a bigger view

Red line:
Before going to freeze the brooch, you need to acquire the pills and cassette tape.
For this we walk right instead of up at the crossing path to enter the cabins.
Make your way towards the pills.
Green line:
Then walk south to enter the sauna.
Wait until the brooch changed to the key.
Click the image for a bigger view

Red Line:
With the newly acquried key, you can go back to the lockers.
The most top right locker is from Gustava.
Blue Line:
Enter it with the key and acquire the cassette tape.
Now head back to the crossing paths.
Click the image for a bigger view

Now move onwards to the mensa hall.
At the mensa hall you can freeze the brooch.
Before entering the elevator, there's your last chance to enter the men's bathroom.
So grab the bucket if not already done, then go back down to B3.
Meet Four Horsemen
Video Tutorial:
https://www.youtube.com/watch?v=tGjfz0XFyjs&list=PLp02-dI93qVSciifmhO0gMUSXRXU__Sma&index=9
Tower Bldg. B3
follow the same path up again to reach the top of the island at the crevice.
Tower Bldg. 1F (Spiral)
enter the spiral and punch the left guard.
then follow the path to the elevator that would take you to level 20.
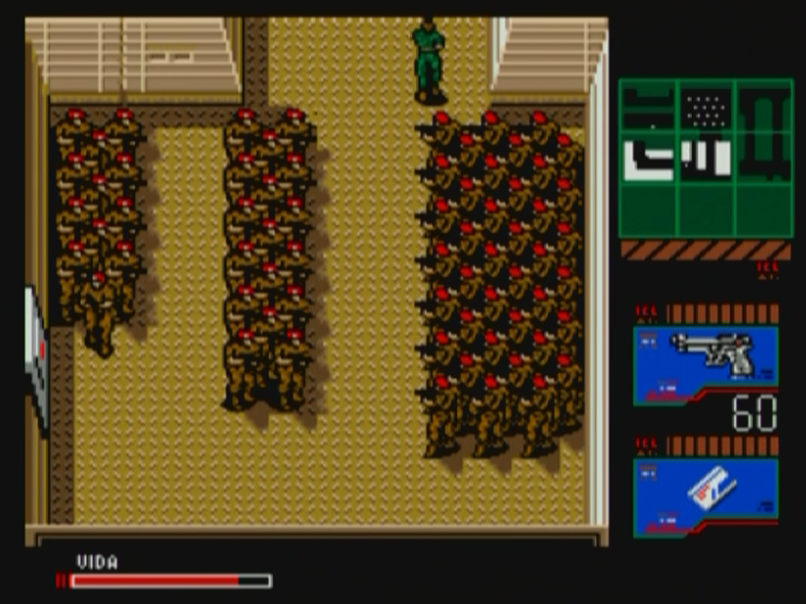
The Four Horsemen (UltraBox)
- Each Horseman takes 3 explosions to kill (mines or grenades)
Video tutorial:
https://www.youtube.com/watch?v=tGjfz0XFyjs&t=571s
New Method:
do circles to bait each of the horseman earlier into the mines rather than waiting for one side to be done first.
Meet Jungle Evil
Video Tutorial:
https://www.youtube.com/watch?v=1zXZT_ufv6U&list=PLp02-dI93qVSciifmhO0gMUSXRXU__Sma&index=10
Tower Bldg. Climb
Tower Bldg. 20F
click for full resolution image

- follow along and distract the first guard with the spider wire
- before hitting the 2nd spider wire, punch the wall to the bottom to distract the second guard
- leave the screen at the most right
- walk up to the railing and punch the third guard to your left
- then equip the cigarettes before transitioning the screen
- and walk up to the ledge
- when Snake begins his smoking animation, equip the glider and walk off the edge
Crevice North
Jungle Evil (Predator)
- Jungle Evil takes 6 grenades to kill
Meet Night Fright
Video Tutorial:
https://www.youtube.com/watch?v=WLg63m0jVi0&list=PLp02-dI93qVSciifmhO0gMUSXRXU__Sma&index=11
Lab Building
Testing shows that spending more time on the Prison map results in a better guard position at the laser fence.
Since the egg timer continuosly counts up we won't delay the egg hatching.
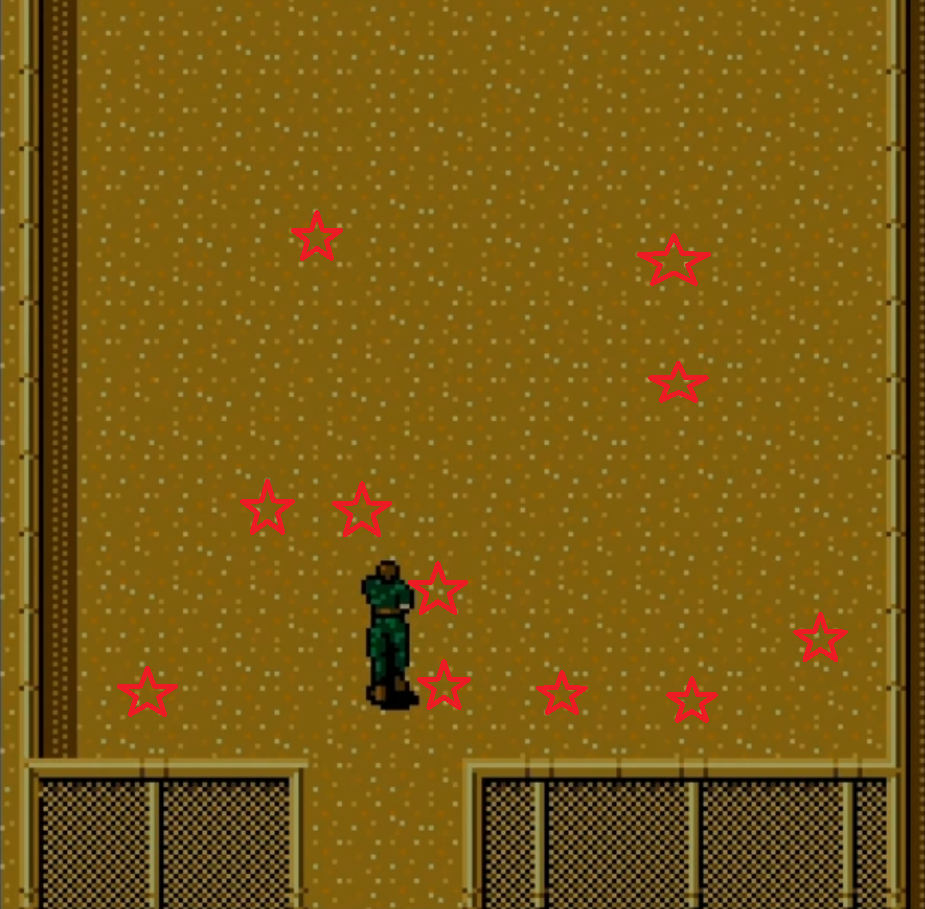
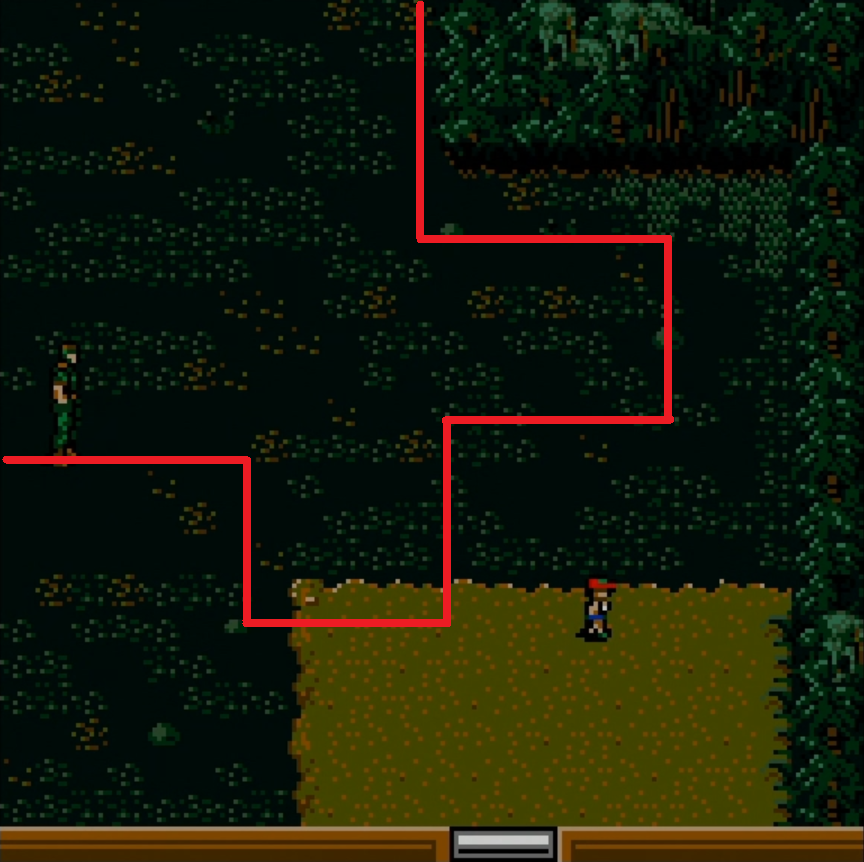
Prison
Make your way up to the top right corner to get your third Ration B1.
While there, punch the wall to the left to get the guards attention.
That way, this guard won't be at the elevator door. Without this distraction,
you'd need to wait for the guard to come closer and punch him to avoid a costly alert.
Night Fright (Night Sight)
Before starting the fight with NIght Fright. Call the 3 missing codec frequencies.
Starting from 140.00
- 140.93 - for Kasler
- 140.40 - for Jacobsen
- 140.38 - for Master Miller
Then begin the fight with Night Fright.
- Night Fright takes 6 grenades to kill
- After the fight, open the elevator first to save yourself the wait time
Meet Dr. Madnar
Video Tutorial:
https://www.youtube.com/watch?v=0vGxNDx0PiI&list=PLp02-dI93qVSciifmhO0gMUSXRXU__Sma&index=12
Card 9 & Green Card Backtrack
After walking back and acquiring the level 9 card. It is time to get the last item.
The green card.
To acquire the green card, we need to head all the way back to building 1.
For this use the box and the island's most bottom left truck to teleport back into the spiral.
Inside the spiral, follow the path and leave through the southern door.
Make it past the desert and the lost woods and enter building 1.
Once there, go back into the room with the colored cards and get the green card behind the level 9 door.
After that, head out again towards the lost woods and go through the swamp to enter the room south of running man's room.
Take the truck, return back to the spiral. Inside the spiral, follow north and enter the northern truck room.
Take that truck and you'll land at the south eastern trucks of the island. Continue from here as normal with your playthrough.
Dr. Madnar
- Dr. Madnar takes 4 explosions to kill (mines, grenades or C4)
Video Tutorial:
https://www.youtube.com/watch?v=0vGxNDx0PiI&list=PLp02-dI93qVSciifmhO0gMUSXRXU__Sma&index=12&t=220s
Meet Metal Gear D
Video Tutorial:
https://www.youtube.com/watch?v=ddBn-SS3uPE&list=PLp02-dI93qVSciifmhO0gMUSXRXU__Sma&index=13
Acquire Oilix Cartridge
Metal Gear D
- Metal Gear D takes 11 grenades to kill.
Remember to show your inventory and weapons before entering Metal Gear D's room.
Weapons:

- Handgun
- Submachinegun
- Grenades
- Stinger
- Remote Controlled Missiles
- Explosives
- Camo Mat
- Gas Grenade
- Robot Mouse
- (Mines are usually fully used up as we don't grab unnecessary extra mines)
Items:

- Cigarettes
- Binoculars
- Night Vision Goggles
- Gas Mask
- Body Armor
- Oxygen Tank
- Mine Detector
- Cardboard Box
- Bucket
- Pills
- Cassette
- Owl
- (Snake does not count towards 100% goal!)
- Brooch
- Red Card
- Blue Card
- Green Card
- MSX Cartridge
- (Optional leftover rations, all rations are mandatory for game progress so they have to have been picked up already)
Gray Fox
Video Tutorial:
https://www.youtube.com/watch?v=ddBn-SS3uPE&list=PLp02-dI93qVSciifmhO0gMUSXRXU__Sma&index=13
- Gray Fox dies with 3 hits from mines
Big Boss
Video Tutorial:
https://www.youtube.com/watch?v=XEoPnAZ_cr8&list=PLp02-dI93qVSciifmhO0gMUSXRXU__Sma&index=14
- Big Boss takes 8 hits from the selfmade flame thrower
- Room Route Map by SolidSpiderZnake
Ideal Big Boss Scenario Example
Escape
Key Notes:
- the IGT continues even after the “No Ammo” dialog until the screen fades to black
- try to end up with Snake's final position where he'd go to after the “No Ammo” dialog as to minimize walking
Side by Side comparison if walking up to the final position saves time (It saves around half a second)