Table of Contents
Stage 05 Easy
Easy difficulty is Ghost Babel with training wheels.
- More resources spawn
- Some bosses become easier
- Snake is built like a tank, needing a ration is fairly unlikely.
- Fewer guards and cameras
- One of the awkward aspects of Easy is that Alerts and Evasions clear faster than other difficulties.
- Guards without body armor die in 1 bullet, 2 bullets with body armor.
- Guards without body armor will die immediately if you triple punch them.
- Map correction, there are stuns in the B1 spiral on the right, not chaffs
<html> <b><span style=“color:Red”>LOOK BELOW FOR ROUTE UPDATES</span></b> </html>
- Going right side when entering the conveyor belt from the elevator saves approximately 14 frames over left side
- First trip of Dark Room (going right): Exit then re-enter the room, run through first set of lasers, run to right edge of laser box, wait for the percussion track to complete its 3rd set of taps, or about 5 seconds of waiting.
- Second trip of Dark Room (going left): Stay in room after killing Snake, go to bottom wall, wait for the 2nd long synth note or the percussion track beginning its 2nd set of taps, or about 3 seconds of waiting. Run to left edge of 2nd laser box and wait for the percussion to begin its 4th set of percussion tracks, or about 4 seconds of waiting.
- DO NOT talk to Jimmy if you are doing thermal goggles skip, or else the story flag will continue you at Jimmy, rather than the dark room.
- There is no camera at the end of the first drop, meaning the margin of error or need for a camshot as a back up is gone.
- There is no guard in the room after the ID card upgrade.
- There is no guard after the blue box drop.
- It takes multiple grenades to bring yourself near death before the death abuse. This is where Snake being a tank becomes a liability.
- There are no guards after the double camera screen during the C4 run.
- It is faster to do camshot at this screen, Clip example here.
- Faster to kill the guard with your gun. Clip example is here
TRIP 1 - Red Box
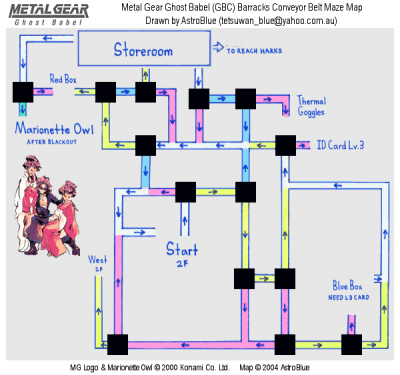
Sorter 0 is the initial sorter, you will ALWAYS use Yellow at that sorter, because Red leads you to looping back to the start
| Sorter | Color | Direction |
|---|---|---|
| 0 | Yellow | Right |
| 1 | Yellow | Down |
| 2 | Yellow | Right |
| 3 | Yellow | Up |
| 4 | Yellow | Left |
| 5 | Yellow | Left |
| 6 | Yellow | Left |
TRIP 2 - ID Card Level 3
Sorter 0 is the initial sorter, you will ALWAYS use Yellow at that sorter, because Red leads you to looping back to the start
| Sorter | Color | Direction |
|---|---|---|
| 0 | Yellow | Right |
| 1 | Yellow | Down |
| 2 | Yellow | Right |
| 3 | Yellow | Up |
| 4 | Red | Right |
TRIP 3 - Blue Box
Sorter 0 is the initial sorter, you will ALWAYS use Yellow at that sorter, because Red leads you to looping back to the start
| Sorter | Color | Direction |
|---|---|---|
| 0 | Yellow | Right |
| 1 | Yellow | Down |
| 2 | Yellow | Right |
| 4 | Red | Down |
| 5 | Yellow | Right |
| 6 | Red | Up |
TRIP 4 - C4
Sorter 0 is the initial sorter, you will ALWAYS use Yellow at that sorter, because Red leads you to looping back to the start
| Sorter | Color | Direction |
|---|---|---|
| 0 | Yellow | Right |
| 1 | Blue | Up |
| 2 | Yellow | Left |
| 3 | Blue | Right |
| 4 | Yellow | Up |
If you do not want to do Thermal Goggles skip, do Trip 5 as an extension, then repeat Trip 4.
TRIP 5 - Dr. Harks
| Sorter | Color | Direction |
|---|---|---|
| 1 | Blue | Right |
| 2 | Red | Right |
C4 Position
- Fastest position to place the C4
- Fastest position to blow up the C4


